No Bake Cottage Cheese Cheesecake
If you’re craving something creamy, light, and a little bit indulgent without turning on the oven, this no bake cottage cheese cheesecake is exactly the kind of dessert that fits the moment. It comes together with simple ingredients, yet the texture is surprisingly smooth and rich—almost like a classic cheesecake, but with a fresher, lighter feel.
Cottage cheese might not be the first thing you think of when making dessert, but it really shines here. Once blended, it turns silky and mild, creating a beautiful base for a no bake cheesecake that feels both satisfying and not overly heavy. It’s one of those cottage cheese dessert ideas that quietly wins you over after the first bite.
This recipe is also a great answer to the question of what to make with cottage cheese when you want something sweet instead of savory. It blends easily with a few pantry staples, sets beautifully in the fridge, and delivers that creamy cheesecake experience without any baking stress. Perfect for warm days, busy weeks, or whenever you want dessert without too much effort.
The best part is how flexible it is. You can keep it simple with a graham cracker crust, or dress it up with fruit, honey, or chocolate. However you serve it, this cottage cheese cheesecake brings a refreshing twist to a classic favorite—and it might just become your new go-to no bake treat.
Why You’ll Love It
- It’s unbelievably creamy without feeling heavy: The blended cottage cheese gives you that smooth, rich cheesecake texture, but it still feels light enough to enjoy a generous slice without the “too full” feeling.
- No oven, no stress: This no bake cheesecake skips all the baking steps, which means no worrying about cracks, water baths, or timing it perfectly. Just mix, chill, and enjoy.
- High-protein twist on dessert: Using cottage cheese adds a little extra protein, making this feel more balanced compared to traditional cheesecake—so it’s a sweet treat you can feel good about.
- Simple ingredients you probably already have: Nothing fancy or hard to find here. It comes together with everyday fridge and pantry staples, which makes it perfect for last-minute dessert cravings.
- Easy to customize: You can keep it classic or switch it up with fruit toppings, chocolate drizzle, lemon zest, or even a cookie crust. It adapts easily to your mood or occasion.
Ingredient List
For the crust:
- 1 ½ cups graham cracker crumbs
- 6 tbsp melted butter
- 2 tbsp sugar
For the cheesecake filling:
- 2 cups cottage cheese
- 8 oz cream cheese (softened)
- ½ cup powdered sugar
- 1 tsp vanilla extract
- 2 tbsp lemon juice
- 1 cup heavy whipping cream
Optional topping:
- Fresh berries
- Honey or fruit sauce
- Chocolate drizzle
Ingredient Notes
- Cottage cheese: I always use full-fat cottage cheese for this—it blends much smoother and gives the cheesecake that rich, creamy texture without any graininess. If you can, blend it until completely silky for the best result.
- Cream cheese: Don’t skip this! It helps stabilize the filling and gives that classic cheesecake flavor. I usually go for the full-fat block version because it sets better than spreadable kinds.
- Heavy cream: This is what makes the filling light and airy. Whipping it first and then folding it in gives the cheesecake that soft, mousse-like finish.
- Lemon juice: Just a small amount makes a big difference. It balances the sweetness and gives the cheesecake a subtle fresh flavor that keeps it from tasting too heavy.
- Graham crackers: I like using classic honey graham crackers because they add a slight sweetness to the crust. If you want a deeper flavor, digestive biscuits also work beautifully.
Kitchen Equipment Needed
- Blender or food processor – To fully blend the cottage cheese until smooth and creamy with no lumps
- Mixing bowls (2–3) – One for the crust, one for the filling, and an extra for whipping the cream
- Hand mixer or stand mixer – Makes whipping the cream quick and helps create a light, fluffy texture
- 9-inch springform pan – My favorite for cheesecakes because it releases easily and keeps the shape neat
- Rubber spatula – Perfect for folding everything together without deflating the whipped cream
- Measuring cups and spoons – For accurate measurements so the texture and sweetness turn out just right
- Food processor (for crust, optional but handy) – If you’re not using pre-crushed crumbs, this makes the crust prep super fast
Instructions
Step 1: Prepare the crust
- Start by crushing your graham crackers until they look like fine, sandy crumbs. You can do this in a food processor or place them in a zip bag and roll over them with a rolling pin.
- In a bowl, mix the crumbs with melted butter and sugar until everything looks evenly coated and slightly damp.
- Press the mixture firmly into the bottom of a 9-inch springform pan. Use the back of a spoon or a flat glass to really pack it down so it holds together well.
Pro tip: Press the crust tightly and evenly—this helps it stay firm when slicing later.
- Place the crust in the fridge while you prepare the filling.
Step 2: Blend the cottage cheese mixture
- Add the cottage cheese to a blender or food processor. Blend until completely smooth and creamy with no lumps.
- Once smooth, add the softened cream cheese, powdered sugar, vanilla extract, and lemon juice. Blend again until everything is fully combined and silky.
Pro tip: Take your time blending here. The smoother the mixture, the creamier your cheesecake will taste—no grainy texture allowed.
- Set the mixture aside.
Step 3: Whip the cream
- In a separate bowl, pour in the cold heavy whipping cream.
- Using a hand mixer or stand mixer, whip until stiff peaks form. This usually takes a few minutes, so don’t rush it.
- You’ll know it’s ready when the cream holds its shape and looks fluffy.
Pro tip: Chill your bowl and beaters for 10 minutes before whipping—it helps the cream whip faster and hold better.
Step 4: Combine everything
- Gently fold the whipped cream into the blended cottage cheese mixture.
- Do this slowly using a spatula, turning the bowl as you go. The goal is to keep the mixture light and airy.
- Keep folding until no streaks remain and everything looks smooth and fluffy.
Pro tip: Don’t stir aggressively—folding keeps the cheesecake filling soft and mousse-like.
Step 5: Assemble and chill
- Pour the filling over your chilled crust and spread it evenly with a spatula.
- Tap the pan lightly on the counter to remove any air bubbles and smooth the top.
- Cover and refrigerate for at least 6 hours, but overnight is best for a firm, sliceable texture.
Pro tip: Patience is key here—the longer it chills, the better it sets and the cleaner your slices will be.
Step 6: Serve and decorate
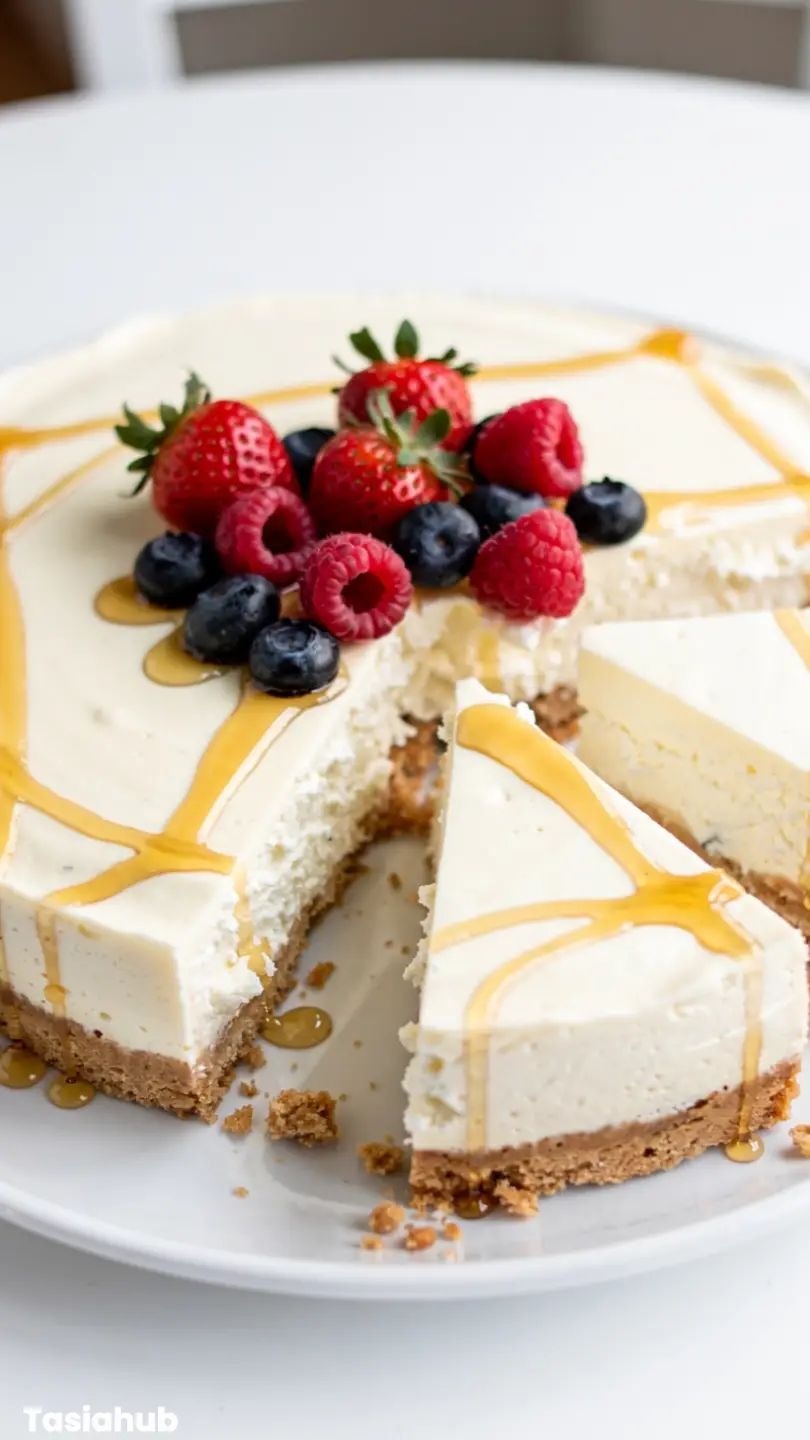
- Once fully set, carefully remove the cheesecake from the springform pan.
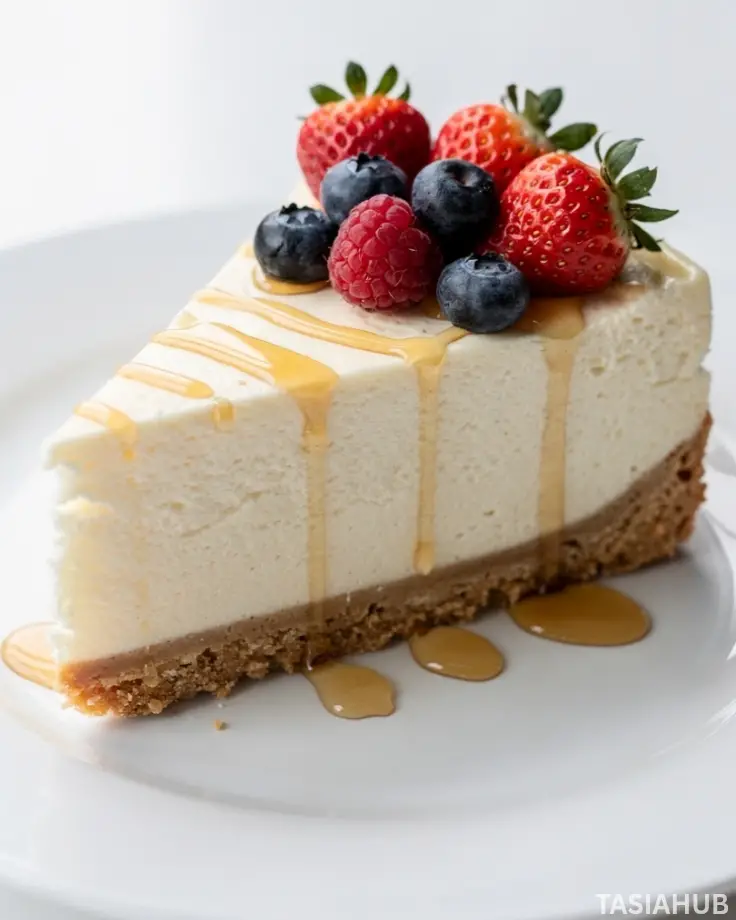
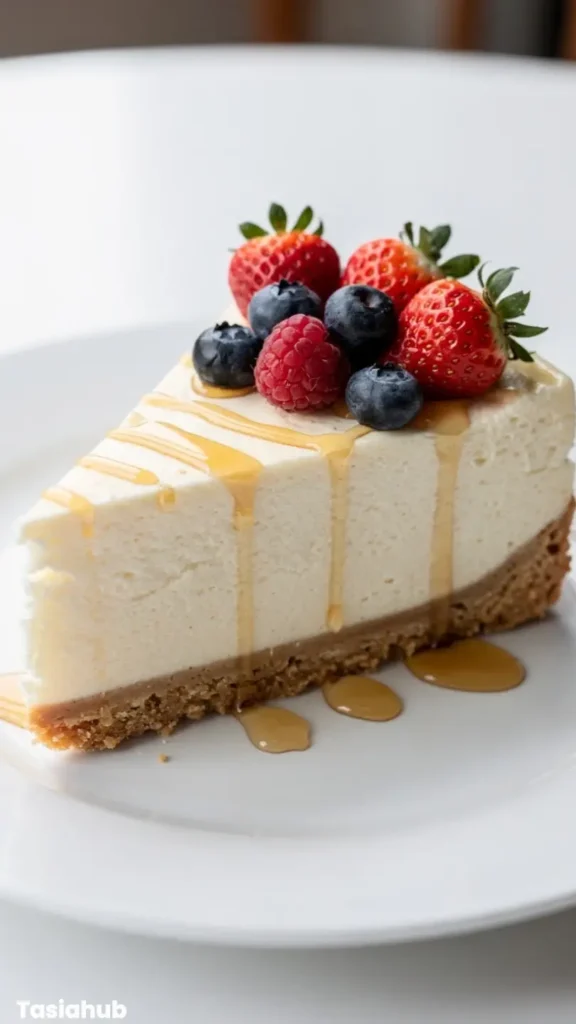
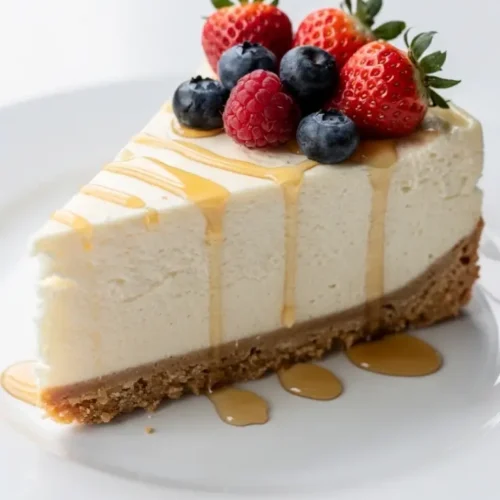
- Top with fresh berries, a drizzle of honey, or chocolate sauce if you like.
- Slice, serve, and enjoy chilled for the best texture and flavor.
Tips and Tricks for Success
- Make sure your cottage cheese is fully blended: Don’t rush this step—keep blending until it’s completely smooth. Any lumps will affect the final texture of your cheesecake.
- Use cold heavy cream for the best volume: Cold cream whips faster and holds its shape better, which gives the filling that light, airy feel.
- Let the cream cheese soften properly: If it’s too cold, it won’t blend smoothly and you might end up with small chunks in the mixture.
- Chill long enough (don’t shortcut this step): At least 6 hours is needed, but overnight chilling gives you the cleanest slices and best structure.
- Press the crust firmly: A tightly packed crust holds together better when slicing and gives a more professional finish.
Ingredient Substitutions and Variations
- Graham crackers → digestive biscuits or Oreos: Digestive biscuits give a more buttery flavor, while Oreos create a chocolatey crust twist.
- Cottage cheese → blended ricotta (in a pinch): Ricotta works, but the texture will be slightly richer and less tangy.
- Heavy cream → whipped topping (like Cool Whip): This makes the recipe even easier, though homemade whipped cream gives a fresher taste.
- Sugar → honey or maple syrup: These natural sweeteners add a subtle depth of flavor and work beautifully in a cottage cheese cheesecake.
- Lemon juice → lime juice or orange zest: A small switch can change the flavor profile and add a refreshing citrus note.
- Add-ins for variation: Swirl in fruit puree, chocolate ganache, or peanut butter for a fun twist on this no bake cheesecake.
Serving Suggestions
- I love serving this no bake cottage cheese cheesecake with a handful of fresh berries on top—it adds a juicy, slightly tangy contrast that makes every bite feel lighter and fresher.
- A drizzle of warm honey or maple syrup takes it to another level, especially if you enjoy a little extra sweetness without overpowering the creamy filling.
- It pairs beautifully with a cup of coffee or tea in the afternoon. I usually serve a small slice as a “me-time” treat when I want something sweet but not too heavy.
- For a more indulgent dessert plate, I like adding a scoop of vanilla ice cream on the side—it melts slightly into the cheesecake and makes it extra dreamy.
- A sprinkle of crushed nuts like almonds or pistachios adds a nice crunch. I love this option when I want a bit of texture contrast against the smooth filling.
Storage and Reheating Instructions
- Store in the refrigerator: Keep the cheesecake covered in the fridge for up to 4–5 days. It stays fresh, creamy, and delicious when properly sealed.
- Use an airtight container or wrap well: This prevents it from absorbing any fridge odors and helps maintain its soft texture.
- Freeze for longer storage: You can freeze slices for up to 1 month. Wrap them individually in plastic wrap and place in a freezer-safe container.
- Thaw before serving: Let frozen slices thaw in the fridge overnight or at room temperature for about 20–30 minutes before eating.
- No reheating needed: This is a chilled dessert, so it’s best served cold straight from the fridge for the perfect texture and flavor.
Frequently Asked Questions
Can I make this cottage cheese cheesecake without a blender?
Yes, but the texture won’t be as smooth. A blender or food processor helps break down the cottage cheese completely, giving you that creamy, cheesecake-like finish.
Does this no bake cheesecake taste like cottage cheese?
Not really. Once blended with cream cheese, sugar, and vanilla, the cottage cheese flavor becomes very mild and almost undetectable.
How long does it take to set properly?
It needs at least 6 hours in the fridge, but overnight chilling is best. The longer it sits, the firmer and easier it is to slice.
Can I make it ahead of time?
Absolutely. This is actually a great make-ahead dessert. You can prepare it a day or two in advance and keep it chilled until serving.
What can I use instead of graham crackers for the crust?
Digestive biscuits, Oreos, or even crushed shortbread cookies all work well. Each one gives a slightly different flavor twist.
Can I make this cheesecake healthier?
Yes, you can reduce the sugar or use honey as a natural sweetener. You can also use low-fat cottage cheese, but the texture may be slightly less rich.
Did you try this recipe? Let me know in the comments how it turned out!
No Bake Cottage Cheese Cheesecake
Equipment
- Blender or Food Processor
- Mixing bowls (2–3)
- Hand mixer or stand mixer
- 9-inch springform pan
- Rubber spatula
- Measuring cups and spoons
- Food processor (for crust, optional but handy)
Ingredients
For the crust:
- 1 ½ cups graham cracker crumbs
- 6 tbsp melted butter
- 2 tbsp sugar
For the cheesecake filling:
- 2 cups cottage cheese
- 8 oz cream cheese softened
- ½ cup powdered sugar
- 1 tsp vanilla extract
- 2 tbsp lemon juice
- 1 cup heavy whipping cream
Optional topping:
- Fresh berries
- Honey or fruit sauce
- Chocolate drizzle
Instructions
Step 1: Prepare the crust
- Start by crushing your graham crackers until they look like fine, sandy crumbs. You can do this in a food processor or place them in a zip bag and roll over them with a rolling pin.
- In a bowl, mix the crumbs with melted butter and sugar until everything looks evenly coated and slightly damp.
- Press the mixture firmly into the bottom of a 9-inch springform pan. Use the back of a spoon or a flat glass to really pack it down so it holds together well.
- Pro tip: Press the crust tightly and evenly—this helps it stay firm when slicing later.
- Place the crust in the fridge while you prepare the filling.
Step 2: Blend the cottage cheese mixture
- Add the cottage cheese to a blender or food processor. Blend until completely smooth and creamy with no lumps.
- Once smooth, add the softened cream cheese, powdered sugar, vanilla extract, and lemon juice. Blend again until everything is fully combined and silky.
- Pro tip: Take your time blending here. The smoother the mixture, the creamier your cheesecake will taste—no grainy texture allowed.
- Set the mixture aside.
Step 3: Whip the cream
- In a separate bowl, pour in the cold heavy whipping cream.
- Using a hand mixer or stand mixer, whip until stiff peaks form. This usually takes a few minutes, so don’t rush it.
- You’ll know it’s ready when the cream holds its shape and looks fluffy.
- Pro tip: Chill your bowl and beaters for 10 minutes before whipping—it helps the cream whip faster and hold better.
Step 4: Combine everything
- Gently fold the whipped cream into the blended cottage cheese mixture.
- Do this slowly using a spatula, turning the bowl as you go. The goal is to keep the mixture light and airy.
- Keep folding until no streaks remain and everything looks smooth and fluffy.
- Pro tip: Don’t stir aggressively—folding keeps the cheesecake filling soft and mousse-like.
Step 5: Assemble and chill
- Pour the filling over your chilled crust and spread it evenly with a spatula.
- Tap the pan lightly on the counter to remove any air bubbles and smooth the top.
- Cover and refrigerate for at least 6 hours, but overnight is best for a firm, sliceable texture.
- Pro tip: Patience is key here—the longer it chills, the better it sets and the cleaner your slices will be.
Step 6: Serve and decorate
- Once fully set, carefully remove the cheesecake from the springform pan.
- Top with fresh berries, a drizzle of honey, or chocolate sauce if you like.
- Slice, serve, and enjoy chilled for the best texture and flavor.
Notes
Nutritional Value (Per Slice – Approximate)
- Calories: 280–360 kcal
- Protein: 10–14g
- Carbohydrates: 20–28g
- Fat: 18–24g
- Sugar: 14–20g
- Fiber: 0–1g
- Calcium: Moderate to high