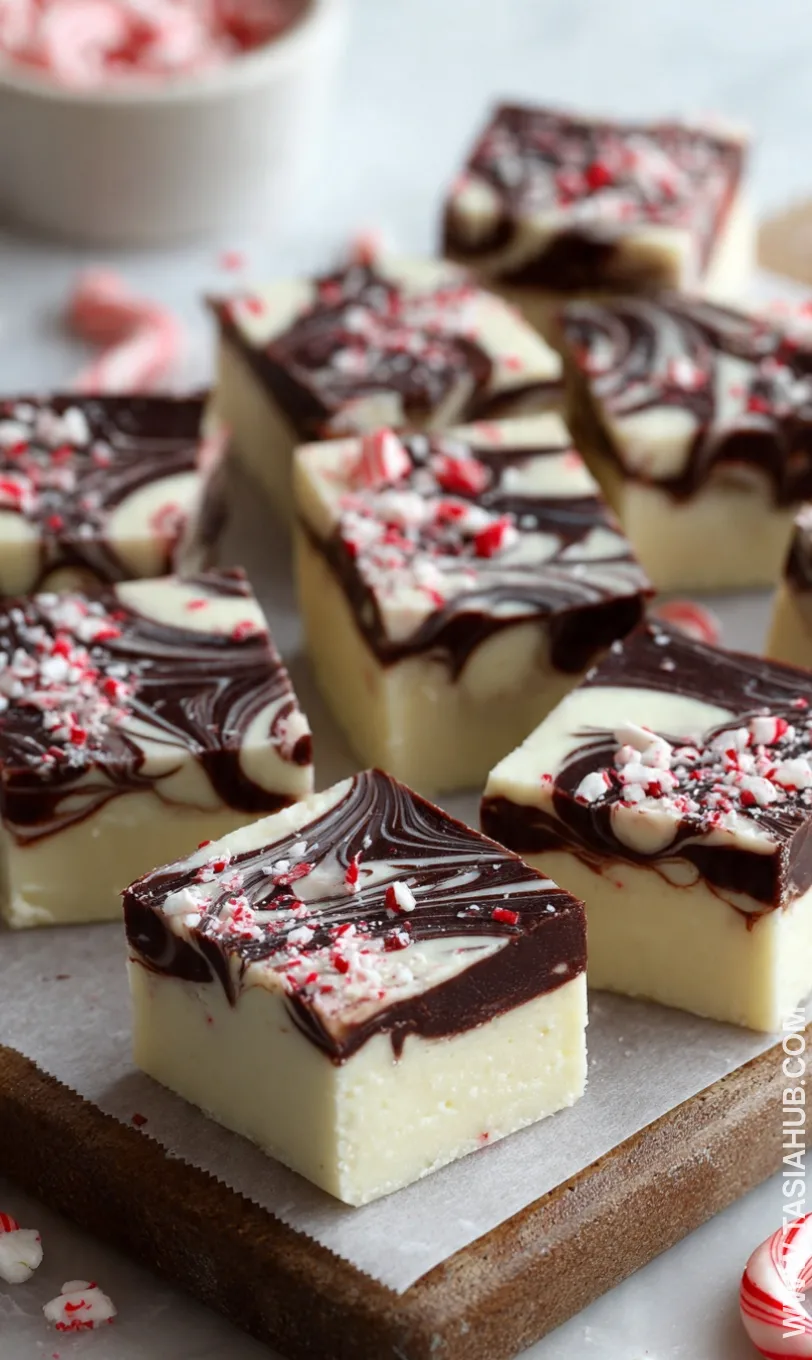
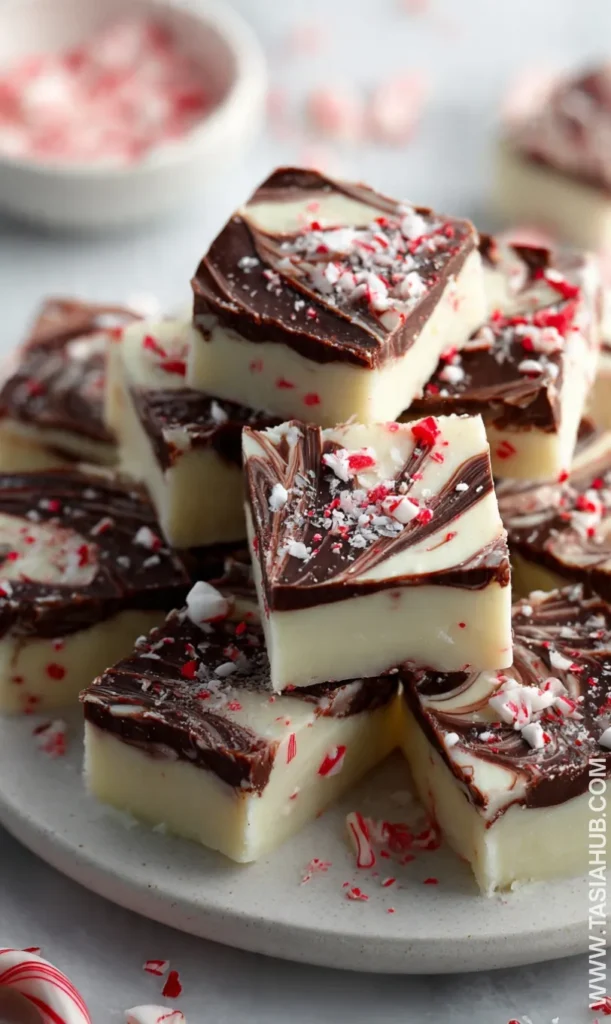
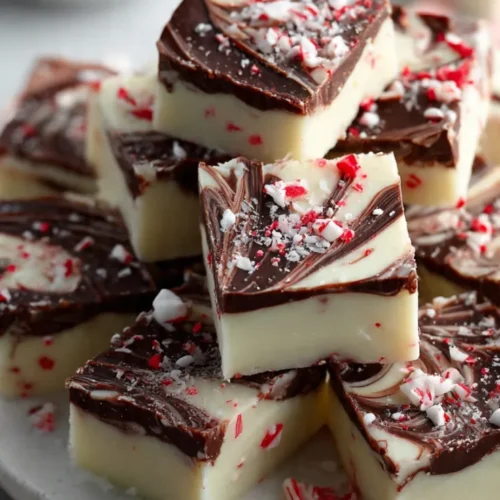
Mint Chocolate Fudge
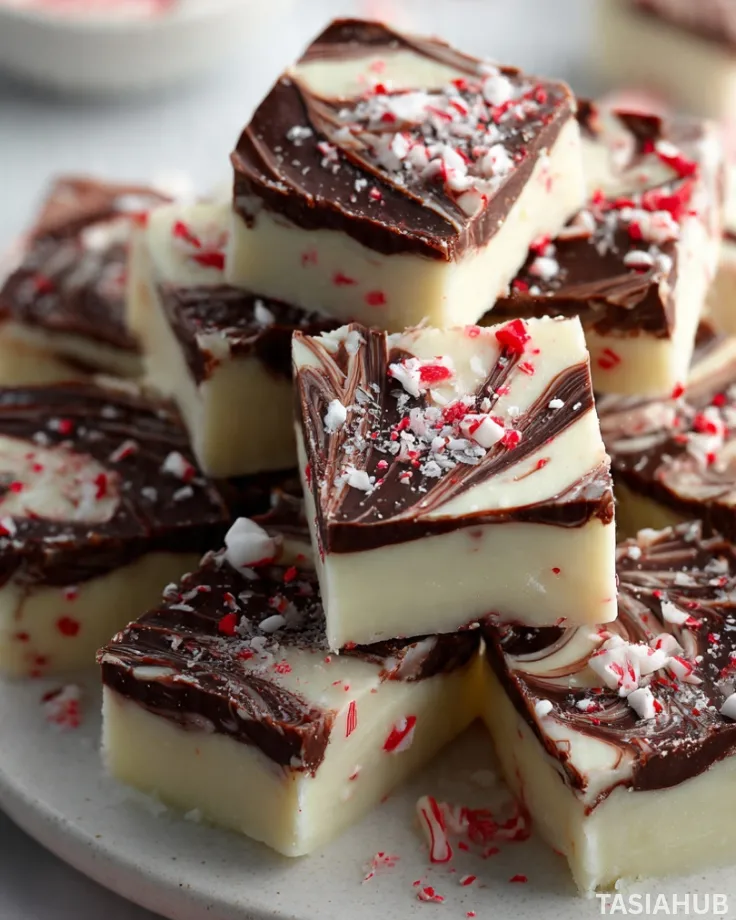
Springtime brings a wonderful opportunity to add fresh, vibrant flavors to your favorite treats, and nothing says festive like a mint chocolate dessert. This mint chocolate fudge is perfect for St Patrick’s day dessert tables, but honestly, it’s a treat you’ll want to make any time the craving for something sweet and refreshing hits. Each bite offers a soft fudge texture that melts in your mouth while carrying that unmistakable hint of mint.
The beauty of this recipe is how simple it is to make. You don’t need to spend hours in the kitchen to achieve a chocolate mint fudge that looks and tastes like it came from a fancy bakery. With just a handful of ingredients, you can whip up an easy mint fudge recipe that delivers big flavor without the fuss. It’s rich, creamy, and perfectly balanced between chocolate and mint.
I love how versatile this mint flavored dessert is. You can cut it into bite-sized squares for parties, layer it into a dessert tray for special occasions, or even package it as a homemade gift for friends and family. The soft fudge is satisfying enough to enjoy on its own, yet decadent enough to share with a crowd.
Whether you’re planning a St Patrick’s day dessert spread or just want a treat to satisfy your chocolate cravings, this mint chocolate fudge fits the bill beautifully. It’s indulgent, refreshing, and so easy to make that it will quickly become a favorite in your dessert rotation.
Why You’ll Love It
- Perfectly Balanced Flavors – The rich chocolate blends seamlessly with the refreshing hint of mint, creating a dessert that’s indulgent but never overpowering. Every bite feels like a little celebration for your taste buds.
- Soft and Creamy Texture – This chocolate mint fudge has that melt-in-your-mouth softness you crave from a homemade treat, making it utterly satisfying whether you’re nibbling one square or two.
- Quick and Simple to Make – With minimal ingredients and easy steps, this easy mint fudge recipe proves that delicious desserts don’t need to be complicated. You’ll have a batch ready in no time.
- Versatile for Any Occasion – Perfect for a St Patrick’s day dessert table, a holiday gathering, or even just a cozy night in. It can be cut into squares, layered in a dessert tray, or wrapped as a thoughtful homemade gift.
- Crowd-Pleasing Treat – Mint chocolate dessert fans and chocolate lovers alike will rave about it. It’s the kind of sweet that disappears fast, so be ready to make a double batch!
Ingredient List
For the Fudge:
- 3 cups white chocolate chips
- 1 (14 oz) can sweetened condensed milk
- 1/4 cup unsalted butter
- 1 tsp peppermint extract
- 1/2 tsp green food coloring (optional, for a festive touch)
For the Chocolate Layer:
- 1 cup semi-sweet chocolate chips
- 1 tbsp unsalted butter
- 1/2 tsp peppermint extract
Optional Topping:
- Crushed peppermint candies or chocolate shavings
Ingredient Notes
- I always use Ghirardelli or Nestlé white chocolate chips for the fudge—it melts beautifully and gives that smooth, soft fudge texture.
- Don’t skip the sweetened condensed milk! It’s what makes this an easy mint fudge recipe and gives it that creamy, melt-in-your-mouth consistency.
- Peppermint extract is key—just a little goes a long way to achieve that mint flavored dessert magic.
- If you want your fudge festive for St Patrick’s day dessert, the green food coloring adds charm, but the flavor is still the same delicious chocolate mint fudge.
- Optional toppings like crushed peppermint candies not only look cute but add a satisfying crunch to the soft fudge.
Kitchen Equipment Needed
- Medium saucepan – For gently melting the white chocolate and butter; I love using a heavy-bottomed one to prevent scorching.
- Heatproof mixing bowl – Perfect for combining chocolate and condensed milk; I usually use a glass bowl so I can see everything melting evenly.
- Spatula – For stirring and scraping the sides; a silicone spatula works best for soft fudge.
- 9×9-inch baking pan – To set the fudge; I line it with parchment paper for easy removal.
- Measuring cups and spoons – Essential for accuracy, especially with peppermint extract.
- Knife – For cutting the fudge into perfect squares once it’s set.
- Optional: Whisk – Helps create a smooth, creamy texture if you want an extra silky chocolate mint fudge.
Instructions
1. Prepare Your Pan
- Line a 9×9-inch baking pan with parchment paper, letting the edges hang over for easy fudge removal later.
- Lightly grease the parchment with a tiny bit of butter or nonstick spray to prevent sticking.
- Pro Tip: Make sure the pan is completely level on your counter—this keeps your fudge from setting unevenly.
2. Melt the White Chocolate Mixture
- In a medium saucepan over low heat, combine the white chocolate chips, sweetened condensed milk, and butter.
- Stir constantly with a heatproof spatula until the chocolate is fully melted and smooth.
- Remove from heat and mix in 1 tsp peppermint extract and optional green food coloring.
- Pro Tip: Stir gently but continuously—this helps prevent the white chocolate from seizing and keeps your fudge soft.
3. Pour and Smooth the Fudge Base
- Pour the white chocolate mixture into your prepared pan, spreading it evenly with a spatula.
- Tap the pan gently on the counter to remove any air bubbles and smooth the top.
4. Make the Chocolate Layer
- In a small saucepan or microwave-safe bowl, melt the semi-sweet chocolate chips and butter over low heat (or in 20-second microwave intervals), stirring until smooth.
- Mix in 1/2 tsp peppermint extract.
- Pour over the white chocolate layer and gently swirl with a knife or skewer to create a marbled effect.
- Pro Tip: Don’t over-swirl! A few gentle loops are enough to make it look fancy without blending the layers completely.
5. Add Optional Toppings
- Sprinkle crushed peppermint candies or chocolate shavings over the top for extra texture and a festive touch.
6. Chill and Set
- Place the pan in the refrigerator for at least 2–3 hours, or until fully set.
- Once set, lift the fudge out using the parchment edges and cut into squares with a sharp knife.
- Pro Tip: Warm the knife slightly under hot water and wipe dry before cutting—this gives cleaner edges for each square.
Tips and Tricks for Success
- Use quality chocolate – The better the chocolate, the smoother and richer your fudge will taste. I always go for Ghirardelli or Nestlé.
- Low and slow heat – Melt chocolate on low heat to prevent scorching and achieve that perfect soft fudge texture.
- Don’t skip the peppermint extract – Even a small amount makes a big difference for that mint flavored dessert flavor.
- Smooth spatula strokes – When spreading the fudge, use gentle, even strokes to avoid air pockets and uneven layers.
- Chill completely – Let the fudge set fully in the fridge before cutting for clean, perfect squares.
Ingredient Substitutions and Variations
- White chocolate – You can use milk chocolate for a sweeter, less intense mint chocolate fudge.
- Peppermint extract – Try spearmint extract for a slightly different mint flavor.
- Butter – Coconut oil works as a lighter alternative, but it may slightly alter the fudge texture.
- Toppings – Swap crushed peppermint candies for mini chocolate chips, rainbow sprinkles, or chopped nuts for extra texture.
- Green food coloring – Skip it or use natural matcha powder for a healthier, festive twist.
Serving Suggestions
- I love serving this mint chocolate fudge chilled on a festive platter for a St Patrick’s day dessert—it always disappears first at parties!
- Pair a square with a hot cup of coffee or peppermint tea for a cozy afternoon treat.
- Layer pieces between wax paper in a dessert box as a homemade gift—it’s always a hit with friends and family.
- Serve alongside fresh berries or whipped cream for an elegant twist at dessert gatherings.
- Cut into tiny bite-sized squares for a sweet addition to a dessert buffet or chocolate mint dessert tray.
Storage and Reheating Instructions
- Store fudge in an airtight container in the refrigerator for up to 2 weeks.
- For longer storage, wrap squares tightly in plastic wrap and freeze for up to 3 months.
- To enjoy at room temperature, remove from fridge 15–20 minutes before serving—it softens slightly and becomes melt-in-your-mouth.
- Avoid microwaving directly in the container; if you want a warm piece, microwave a single square on a plate for 10–15 seconds.
- Keep away from direct sunlight or heat to maintain the soft fudge texture.
Frequently Asked Questions
Can I make this fudge without white chocolate?
Yes! You can use milk chocolate or even dark chocolate instead. The texture will still be soft fudge, though the flavor will be richer and less sweet.
How do I get the fudge perfectly smooth?
Make sure to melt the chocolate slowly over low heat and stir continuously. Using a spatula to scrape the sides helps prevent lumps and keeps it creamy.
Can I make this ahead of time for St Patrick’s day dessert?
Absolutely! You can make it a few days in advance and store it in the fridge. Just cut it into squares right before serving for the best presentation.
Can I freeze the fudge?
Yes! Wrap each square tightly in plastic wrap and store in an airtight container. It can last up to 3 months in the freezer. Thaw in the fridge before serving.
Can I add mix-ins like nuts or candies?
Definitely! Chopped nuts, mini chocolate chips, or crushed peppermint candies make a fun variation and add extra texture to this mint chocolate dessert.
What’s the best way to cut clean squares?
Use a sharp knife and warm it slightly under hot water, then wipe dry before cutting. This prevents the fudge from sticking and gives smooth edges.
Did you try this mint chocolate fudge? Let me know in the comments how it turned out!
Mint Chocolate Fudge
Equipment
- Medium saucepan
- Heatproof mixing bowl
- Spatula
- 9×9-inch baking pan
- Measuring cups and spoons
- Knife
- Optional whisk
Ingredients
For the Fudge:
- 3 cups white chocolate chips
- 1 14 oz can sweetened condensed milk
- 1/4 cup unsalted butter
- 1 tsp peppermint extract
- 1/2 tsp green food coloring optional, for a festive touch
For the Chocolate Layer:
- 1 cup semi-sweet chocolate chips
- 1 tbsp unsalted butter
- 1/2 tsp peppermint extract
Optional Topping:
- Crushed peppermint candies or chocolate shavings
Instructions
Prepare Your Pan
- Line a 9×9-inch baking pan with parchment paper, letting the edges hang over for easy fudge removal later.
- Lightly grease the parchment with a tiny bit of butter or nonstick spray to prevent sticking.
- Pro Tip: Make sure the pan is completely level on your counter—this keeps your fudge from setting unevenly.
Melt the White Chocolate Mixture
- In a medium saucepan over low heat, combine the white chocolate chips, sweetened condensed milk, and butter.
- Stir constantly with a heatproof spatula until the chocolate is fully melted and smooth.
- Remove from heat and mix in 1 tsp peppermint extract and optional green food coloring.
- Pro Tip: Stir gently but continuously—this helps prevent the white chocolate from seizing and keeps your fudge soft.
Pour and Smooth the Fudge Base
- Pour the white chocolate mixture into your prepared pan, spreading it evenly with a spatula.
- Tap the pan gently on the counter to remove any air bubbles and smooth the top.
Make the Chocolate Layer
- In a small saucepan or microwave-safe bowl, melt the semi-sweet chocolate chips and butter over low heat (or in 20-second microwave intervals), stirring until smooth.
- Mix in 1/2 tsp peppermint extract.
- Pour over the white chocolate layer and gently swirl with a knife or skewer to create a marbled effect.
- Pro Tip: Don’t over-swirl! A few gentle loops are enough to make it look fancy without blending the layers completely.
Add Optional Toppings
- Sprinkle crushed peppermint candies or chocolate shavings over the top for extra texture and a festive touch.
Chill and Set
- Place the pan in the refrigerator for at least 2–3 hours, or until fully set.
- Once set, lift the fudge out using the parchment edges and cut into squares with a sharp knife.
- Pro Tip: Warm the knife slightly under hot water and wipe dry before cutting—this gives cleaner edges for each square.
Notes
Nutritional Value (per serving, approx.):
- Calories: 180–200 kcal
- Fat: 10–12 g
- Saturated Fat: 6–7 g
- Carbohydrates: 22–25 g
- Sugars: 20–22 g
- Protein: 1–2 g
- Fiber: <1 g
- Sodium: 35–50 mg