Red Velvet Cinnamon Rolls
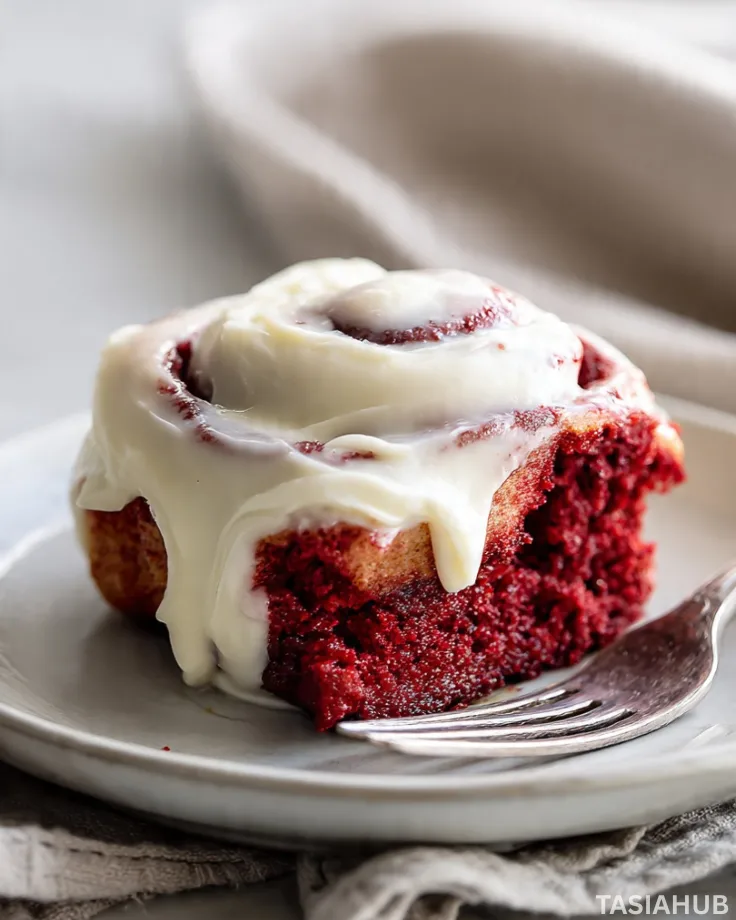
Valentine’s Day is the perfect excuse to indulge in something sweet, decadent, and a little bit romantic. This year, skip the ordinary chocolates and cookies and treat yourself — or your loved one — to a batch of homemade red velvet cinnamon rolls. These soft, tender rolls combine the classic flavors of red velvet cake with the irresistible swirl of cinnamon sugar, finished with a creamy, dreamy glaze that makes every bite feel like a celebration.
Baking red velvet cinnamon rolls from scratch is surprisingly simple, and the reward is beyond worth it. The dough is soft and pillowy, tinted with that iconic red hue, while the cinnamon filling adds a warm, cozy touch. Each roll comes out perfectly fluffy, and when you drizzle them with cream cheese frosting, it feels like you’ve created a bakery-worthy treat right in your own kitchen.
What makes these Valentine’s cinnamon rolls extra special is their festive vibe. The rich red color paired with the sweet, buttery filling makes them a delightful centerpiece for breakfast in bed or a brunch spread. They’re fun to make with family, friends, or even as a solo baking project, and the smell wafting through your kitchen is enough to make anyone smile.
These Valentine’s Day cinnamon rolls aren’t just about looks — every bite is a perfect balance of sweetness and warmth. Whether you’re sharing them with your partner, family, or friends, these homemade red velvet cinnamon rolls are guaranteed to impress. Plus, they’re a thoughtful alternative for anyone who prefers a more personal, homemade touch over store-bought treats.
Why You’ll Love It
- Soft, Fluffy, and Dreamy: Each roll is tender and pillowy, practically melting in your mouth, making these red velvet cinnamon rolls feel like a special treat with every bite.
- Perfect Balance of Flavors: The subtle cocoa notes of red velvet blend beautifully with the warm cinnamon sugar filling, creating a flavor combination that’s sweet, rich, and irresistibly comforting.
- Show-Stopping Presentation: With their vibrant red swirls and creamy glaze, these Valentine’s day cinnamon rolls look as amazing as they taste — perfect for a brunch table, dessert platter, or breakfast in bed.
- Homemade Touch, Big Impact: There’s something so satisfying about making these from scratch. They’re a heartfelt way to show someone you care, and the aroma alone is enough to fill your home with cozy vibes.
- Versatile for Any Celebration: While they’re perfect for Valentine’s Day, these rolls are equally delightful for birthdays, brunches, or anytime you want a sweet homemade treat that feels extra special.
Ingredient List
For the Dough
- 3 ½ cups all-purpose flour
- ¼ cup granulated sugar
- 2 ¼ tsp (1 packet) active dry yeast
- 1 tsp salt
- ½ cup whole milk, warm
- ¼ cup unsalted butter, melted
- 2 large eggs
- 2 tbsp cocoa powder
- 2–3 drops red food coloring
For the Cinnamon Filling
- ½ cup brown sugar, packed
- 2 tbsp ground cinnamon
- ¼ cup unsalted butter, softened
For the Cream Cheese Glaze
- 4 oz cream cheese, softened
- ¼ cup unsalted butter, softened
- 1 cup powdered sugar
- ½ tsp vanilla extract
- 1–2 tbsp milk (as needed for consistency)
Ingredient Notes
- I always use Daisy or Philadelphia cream cheese for the glaze—it makes it super creamy and not too tangy.
- Don’t skip the cocoa powder in the dough! It deepens that red velvet flavor beautifully.
- Use warm milk, not hot — it wakes up the yeast without killing it.
- For the red color, just a few drops go a long way; too much food coloring can affect the dough texture.
- Brown sugar in the cinnamon filling is key for that caramelized, slightly gooey swirl.
Kitchen Equipment Needed
- Mixing Bowls (large and medium): For combining dough and filling — I love using glass bowls so you can see everything come together.
- Measuring Cups & Spoons: Accurate measurements make these rolls turn out perfectly every time.
- Whisk: For mixing sugar, eggs, and wet ingredients quickly.
- Wooden Spoon or Silicone Spatula: Great for folding the dough without overworking it.
- Stand Mixer with Dough Hook (optional): Makes kneading a breeze, especially for soft, sticky dough.
- Rolling Pin: To roll out the dough evenly — I swear by a heavy wooden one for smooth results.
- Baking Pan (9×13 inch or similar): Holds the rolls snugly so they bake evenly.
- Pastry Brush: Perfect for spreading butter on the cinnamon filling.
- Sharp Knife or Bench Scraper: To cut the rolled dough into even pieces.
- Oven Mitts: Safety first — the rolls come out piping hot!
Instructions
Step 1: Prepare the Dough
- In a large mixing bowl, combine warm milk, granulated sugar, and yeast. Stir gently and let it sit for 5–10 minutes until foamy.
- Pro Tip: If your yeast doesn’t foam, it might be too old or your milk too hot. Warm, not hot, is the key!
- In a separate bowl, whisk together the eggs, melted butter, cocoa powder, and red food coloring until smooth.
- Add the wet mixture to the yeast mixture, stirring to combine.
- Gradually add flour and salt, mixing until a soft dough forms.
- Knead the dough on a floured surface for 8–10 minutes until smooth and slightly elastic.
- Pro Tip: Dough should be slightly sticky but not clingy. Dust your hands with flour if needed.
Step 2: Let the Dough Rise
- Lightly grease a large bowl with butter or oil.
- Place the dough in the bowl and cover with a clean kitchen towel or plastic wrap.
- Let it rise in a warm spot for 1–1.5 hours, or until doubled in size.
- Pro Tip: If your kitchen is cool, preheat your oven to 200°F for 2 minutes, turn it off, and place the bowl inside to rise.
Step 3: Prepare the Filling
- In a small bowl, mix together brown sugar and cinnamon.
- Spread softened butter over the rolled-out dough (see next step).
- Sprinkle the cinnamon sugar evenly over the buttered dough.
Step 4: Roll and Cut the Dough
- On a floured surface, roll the dough into a rectangle about ¼ inch thick.
- Spread the softened butter evenly across the dough.
- Sprinkle the cinnamon sugar mixture on top, covering every inch.
- Starting from the long edge, roll the dough tightly into a log.
- Use a sharp knife or bench scraper to cut into 12–15 even rolls.
- Pro Tip: Keep the knife moist or lightly floured to get clean cuts without squishing the rolls.
Step 5: Second Rise
- Place the rolls in a greased 9×13 inch baking pan, leaving a little space between them.
- Cover loosely with a towel and let rise for 30–45 minutes until puffy.
Step 6: Bake the Rolls
- Preheat your oven to 350°F (175°C).
- Bake the rolls for 20–25 minutes, or until they are lightly golden and cooked through.
- Pro Tip: Check the center of a roll with a toothpick — it should come out clean but slightly moist.
Step 7: Make the Cream Cheese Glaze
- In a medium bowl, beat together cream cheese and butter until smooth.
- Add powdered sugar and vanilla extract, mixing until fully combined.
- Add milk 1 tbsp at a time until you reach a pourable consistency.
- Pro Tip: Whisk continuously to avoid lumps and make it silky.
Step 8: Glaze and Serve
- Let the rolls cool for 5–10 minutes after baking.
- Drizzle the cream cheese glaze generously over the warm rolls.
- Serve immediately and enjoy the gooey, festive delight!
Tips and Tricks for Success
- Let the dough rise in a warm, draft-free spot — it makes a huge difference in getting fluffy rolls.
- Don’t overfill with cinnamon sugar; too much can make the rolls ooze and lose shape.
- Use room-temperature butter and cream cheese for the glaze to ensure a smooth, creamy finish.
- Slice the rolls evenly so they bake uniformly — a bench scraper or sharp knife helps.
- Brush a little melted butter on the pan before placing the rolls to prevent sticking and add extra flavor.
- Let the rolls cool slightly before glazing; too hot and the glaze will melt off completely.
Ingredient Substitutions and Variations
- Milk: You can swap whole milk with almond, oat, or any plant-based milk for a dairy-free option.
- Butter: Use margarine or coconut oil in the dough and filling if needed.
- Red Food Coloring: Beet juice or natural red food coloring works for a more natural option.
- Cinnamon Sugar Filling: Add a pinch of nutmeg or pumpkin spice for a warm twist.
- Cream Cheese Glaze: Swap cream cheese with mascarpone for a richer, slightly tangier glaze.
- Extra Festive Touch: Sprinkle heart-shaped sprinkles on top of the glaze for Valentine’s Day cinnamon rolls.
Serving Suggestions
- I love serving these red velvet cinnamon rolls warm straight from the oven with a big mug of hot chocolate — it’s pure comfort in every bite.
- They’re perfect for a festive Valentine’s Day breakfast in bed, paired with fresh strawberries or raspberries for a fruity balance.
- I like to slice one roll and serve it alongside a scoop of vanilla ice cream for a fun dessert twist.
- These Valentine’s cinnamon rolls also shine on a brunch table with a light fruit salad and a cup of coffee — it makes any gathering feel extra special.
- For a cozy snack, enjoy a roll with a dollop of whipped cream and a sprinkle of cinnamon on top — indulgence without the fuss!
Storage and Reheating Instructions
- Room Temperature: Store cooled rolls in an airtight container for up to 2 days.
- Refrigerator: Keep in a sealed container for up to 5 days; bring to room temperature or warm before serving.
- Freezer: Wrap individual rolls in plastic wrap and freeze for up to 2 months; thaw overnight in the fridge and warm in the oven.
- Reheating: Heat rolls in a preheated oven at 325°F (160°C) for 5–7 minutes or microwave for 20–30 seconds for a quick warm treat.
- Glaze Tip: Add a little extra drizzle of cream cheese glaze after reheating to revive that fresh-baked look and taste.
Frequently Asked Questions
Can I make these rolls ahead of time?
Absolutely! You can prepare the dough and roll them up the night before, then cover and refrigerate. Let them come to room temperature and rise before baking for fresh, fluffy rolls.
Can I use store-bought dough instead of making it from scratch?
Yes! While homemade red velvet cinnamon rolls are extra special, store-bought dough works in a pinch. Just add your cocoa, red coloring, and cinnamon filling for that festive twist.
How do I keep the rolls soft after baking?
Store them in an airtight container while slightly warm. You can also cover them with foil to keep moisture in. Reheating gently in the oven revives that fresh-baked softness.
Can I make these dairy-free?
Definitely! Swap milk with almond, oat, or soy milk, and butter with margarine or coconut oil. Use a dairy-free cream cheese for the glaze, and you’re all set.
How do I get the cream cheese glaze smooth?
Make sure your cream cheese and butter are at room temperature. Whisk continuously while adding powdered sugar and milk slowly — it should come out silky and pourable.
Can I freeze these rolls?
Yes! Wrap individual rolls in plastic wrap and store in the freezer for up to 2 months. Thaw overnight in the fridge and warm slightly before serving.
Did you try this recipe? Let me know in the comments how it turned out!
Red Velvet Cinnamon Rolls
Equipment
- Mixing bowls (large and medium)
- Measuring Cups & Spoons
- Whisk
- Wooden Spoon or Silicone Spatula
- Stand mixer with dough hook (optional)
- Rolling Pin
- Baking Pan (9×13 inch or similar)
- Pastry Brush
- Sharp knife or bench scraper
- Oven Mitts
Ingredients
For the Dough
- 3 ½ cups all-purpose flour
- ¼ cup granulated sugar
- 2 ¼ tsp 1 packet active dry yeast
- 1 tsp salt
- ½ cup whole milk warm
- ¼ cup unsalted butter melted
- 2 large eggs
- 2 tbsp cocoa powder
- 2 –3 drops red food coloring
For the Cinnamon Filling
- ½ cup brown sugar packed
- 2 tbsp ground cinnamon
- ¼ cup unsalted butter softened
For the Cream Cheese Glaze
- 4 oz cream cheese softened
- ¼ cup unsalted butter softened
- 1 cup powdered sugar
- ½ tsp vanilla extract
- 1 –2 tbsp milk as needed for consistency
Instructions
Step 1: Prepare the Dough
- In a large mixing bowl, combine warm milk, granulated sugar, and yeast. Stir gently and let it sit for 5–10 minutes until foamy.
- Pro Tip: If your yeast doesn’t foam, it might be too old or your milk too hot. Warm, not hot, is the key!
- In a separate bowl, whisk together the eggs, melted butter, cocoa powder, and red food coloring until smooth.
- Add the wet mixture to the yeast mixture, stirring to combine.
- Gradually add flour and salt, mixing until a soft dough forms.
- Knead the dough on a floured surface for 8–10 minutes until smooth and slightly elastic.
- Pro Tip: Dough should be slightly sticky but not clingy. Dust your hands with flour if needed.
Step 2: Let the Dough Rise
- Lightly grease a large bowl with butter or oil.
- Place the dough in the bowl and cover with a clean kitchen towel or plastic wrap.
- Let it rise in a warm spot for 1–1.5 hours, or until doubled in size.
- Pro Tip: If your kitchen is cool, preheat your oven to 200°F for 2 minutes, turn it off, and place the bowl inside to rise.
Step 3: Prepare the Filling
- In a small bowl, mix together brown sugar and cinnamon.
- Spread softened butter over the rolled-out dough (see next step).
- Sprinkle the cinnamon sugar evenly over the buttered dough.
Step 4: Roll and Cut the Dough
- On a floured surface, roll the dough into a rectangle about ¼ inch thick.
- Spread the softened butter evenly across the dough.
- Sprinkle the cinnamon sugar mixture on top, covering every inch.
- Starting from the long edge, roll the dough tightly into a log.
- Use a sharp knife or bench scraper to cut into 12–15 even rolls.
- Pro Tip: Keep the knife moist or lightly floured to get clean cuts without squishing the rolls.
Step 5: Second Rise
- Place the rolls in a greased 9×13 inch baking pan, leaving a little space between them.
- Cover loosely with a towel and let rise for 30–45 minutes until puffy.
Step 6: Bake the Rolls
- Preheat your oven to 350°F (175°C).
- Bake the rolls for 20–25 minutes, or until they are lightly golden and cooked through.
- Pro Tip: Check the center of a roll with a toothpick — it should come out clean but slightly moist.
Step 7: Make the Cream Cheese Glaze
- In a medium bowl, beat together cream cheese and butter until smooth.
- Add powdered sugar and vanilla extract, mixing until fully combined.
- Add milk 1 tbsp at a time until you reach a pourable consistency.
- Pro Tip: Whisk continuously to avoid lumps and make it silky.
Step 8: Glaze and Serve
- Let the rolls cool for 5–10 minutes after baking.
- Drizzle the cream cheese glaze generously over the warm rolls.
- Serve immediately and enjoy the gooey, festive delight!
Notes
Nutritional Value (Per Serving – Approximate)
- Calories: 380–420 kcal
- Carbohydrates: 52g
- Protein: 7g
- Fat: 16g
- Saturated Fat: 9g
- Sugar: 28g
- Fiber: 2g
- Sodium: 320mg