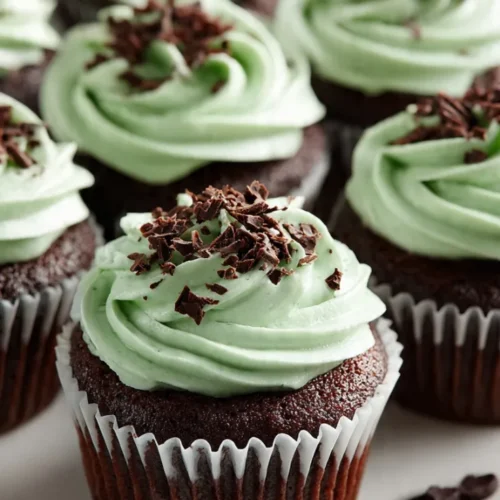
Mint Chocolate Cupcakes
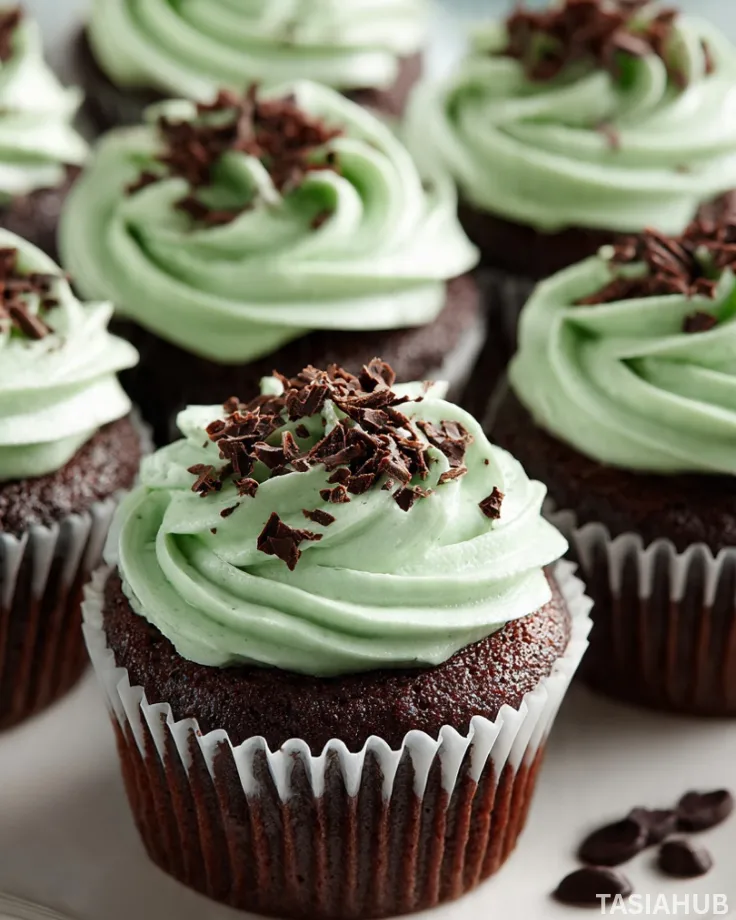
Springtime brings a fresh sense of excitement to the kitchen, and these mint chocolate cupcakes are the perfect way to celebrate. The combination of rich chocolate and refreshing mint creates a flavor that feels indulgent without being overwhelming. Soft, moist, and topped with a swirl of minty frosting, these cupcakes are as delightful to look at as they are to eat.
I love serving these during special occasions, from St Patrick’s day dessert spreads to chocolate birthday cupcakes for friends and family. The green frosting adds a festive touch that instantly lifts the mood at any gathering. Plus, the chocolate base keeps them universally appealing, so even those who aren’t big on mint will happily take a bite.
What makes these easy mint chocolate cupcakes especially fun is how versatile they are. You can dress them up with sprinkles, chocolate shavings, or even a drizzle of melted chocolate for an extra indulgent treat. They’re also great for gifting — a little box of these yummy cupcakes can brighten someone’s day in an instant.
The best part? You don’t need to be a baking expert to make them. With simple ingredients and straightforward steps, these cupcakes come together quickly, giving you more time to enjoy decorating and, of course, tasting. Whether it’s a holiday treat or a spontaneous weekend dessert, these cupcakes are sure to become a favorite.
Why You’ll Love It
- Perfect balance of flavors: The rich chocolate base pairs beautifully with the cool, refreshing mint frosting, giving you a dessert that’s indulgent but never too heavy.
- Festive and fun: Whether you’re celebrating St Patrick’s day dessert ideas or a birthday, the vibrant green frosting makes these cupcakes a showstopper on any table.
- Quick and approachable: These easy mint chocolate cupcakes come together with simple ingredients and steps, so even beginner bakers can create something impressive.
- Customizable toppings: From sprinkles to chocolate curls, you can decorate these yummy cupcakes in endless ways to suit any theme or occasion.
- Loved by everyone: The combination of chocolate and mint is universally appealing, making these cupcakes a hit with kids and adults alike.
Ingredient List
For the Cupcakes
- 1 cup (125g) all-purpose flour
- ¾ cup (75g) unsweetened cocoa powder
- 1 tsp baking powder
- ½ tsp baking soda
- ¼ tsp salt
- ½ cup (115g) unsalted butter, softened
- 1 cup (200g) granulated sugar
- 2 large eggs
- 1 tsp vanilla extract
- ½ cup (120ml) buttermilk
- ½ cup (120ml) hot water
For the Mint Frosting
- 1 cup (230g) unsalted butter, softened
- 3–4 cups (360–480g) powdered sugar
- 2–3 tbsp heavy cream or milk
- 1 tsp peppermint extract
- Green gel food coloring (optional, for festive St Patrick’s day dessert vibes)
- Chocolate chips or shavings for topping (optional)
Ingredient Notes
- I always use high-quality cocoa powder—it makes the chocolate flavor so rich and satisfying.
- Don’t skip the buttermilk! It keeps these easy mint chocolate cupcakes extra moist and tender.
- For the frosting, I love using real peppermint extract instead of artificial flavoring—it gives such a fresh, natural taste.
- Green gel food coloring is optional, but it really makes these cupcakes perfect for a St Patrick’s day dessert display.
- Chocolate chips or shavings on top? Totally optional, but they add that little extra wow factor for chocolate birthday cupcakes.
Kitchen Equipment Needed
- Mixing bowls – For combining wet and dry ingredients. I love using glass bowls because you can see everything clearly.
- Electric mixer or stand mixer – Makes the frosting super smooth and fluffy. Hand mixers work too if that’s what you have.
- Measuring cups and spoons – Accurate measurements make all the difference in baking. My favorite are stainless steel ones—they last forever!
- Cupcake pan – For perfectly shaped cupcakes. Non-stick pans make removal so much easier.
- Cupcake liners – Keeps cupcakes neat and easy to serve. I always use parchment paper liners for a clean look.
- Spatula – For folding ingredients and scraping the bowl. Silicone ones are my go-to.
- Piping bag + tip – Optional, but perfect for creating pretty swirls of mint frosting.
Instructions
Step 1: Preheat and Prep
- Preheat your oven to 350°F (175°C).
- Line a 12-cup cupcake pan with cupcake liners. I like using parchment paper liners—they make cleanup so much easier and the cupcakes slide out perfectly.
- Lightly spray the liners with non-stick cooking spray for extra insurance against sticking.
Pro Tip: Make sure your oven is fully preheated before baking—this helps the cupcakes rise evenly.
Step 2: Mix the Dry Ingredients
- In a medium bowl, sift together the flour, cocoa powder, baking powder, baking soda, and salt.
- Whisk everything until fully combined.
Pro Tip: Sifting the cocoa powder and flour together helps prevent lumps and gives the cupcakes a smoother texture.
Step 3: Cream Butter and Sugar
- In a large mixing bowl, beat the softened butter and sugar together until light and fluffy—about 2–3 minutes with an electric mixer.
- Add the eggs one at a time, mixing well after each addition.
- Stir in the vanilla extract.
Pro Tip: Don’t rush this step! Properly creamed butter and sugar gives the cupcakes a tender, airy crumb.
Step 4: Combine Wet and Dry Ingredients
- Gradually add the dry ingredients to the butter mixture in three parts, alternating with the buttermilk in two parts.
- Begin and end with the dry ingredients, mixing gently to avoid overmixing.
- Slowly stir in the hot water until fully combined—this makes the batter silky and smooth.
Pro Tip: Whisk continuously when adding hot water to prevent any lumps and ensure a glossy, smooth batter.
Step 5: Fill Cupcake Liners
- Spoon the batter evenly into the prepared liners, filling each about 2/3 full.
- Gently tap the pan on the counter to remove any air bubbles.
Pro Tip: Using an ice cream scoop ensures all cupcakes are the same size and bake evenly.
Step 6: Bake
- Bake in the preheated oven for 18–22 minutes, or until a toothpick inserted in the center comes out clean.
- Let the cupcakes cool in the pan for 5 minutes before transferring them to a wire rack to cool completely.
Pro Tip: Avoid frosting the cupcakes while they’re warm—this can cause the frosting to melt and slide off.
Step 7: Make the Mint Frosting
- Beat the softened butter on medium speed until creamy.
- Gradually add the powdered sugar, 1 cup at a time, mixing on low speed at first.
- Add the peppermint extract, heavy cream (or milk), and green gel food coloring. Beat on high until light, fluffy, and smooth.
Pro Tip: Taste the frosting before coloring—you can adjust the mint to your preference.
Step 8: Frost the Cupcakes
- Transfer the frosting into a piping bag fitted with your favorite tip.
- Pipe generous swirls of frosting onto the cooled cupcakes.
- Optional: sprinkle chocolate shavings or chips on top for extra chocolatey goodness.

Tips and Tricks for Success
- Room temperature ingredients – Make sure butter, eggs, and buttermilk are at room temperature for smoother batter and fluffier cupcakes.
- Don’t overmix – When combining wet and dry ingredients, mix just until combined to keep cupcakes tender.
- Check oven temperature – Oven temperatures can vary; use a toothpick to test doneness rather than relying strictly on time.
- Cool completely before frosting – Warm cupcakes can cause frosting to melt and lose shape.
- Use a piping bag – It’s easier and makes your cupcakes look extra polished. You can swirl the frosting in any fun pattern you like!
Ingredient Substitutions and Variations
- Butter substitute – Swap butter for coconut oil or a plant-based margarine for a dairy-free version.
- Milk substitute – Use almond, oat, or soy milk instead of heavy cream or regular milk in the frosting.
- Mint flavor alternative – If peppermint extract is too strong, try a few drops of mint chocolate liqueur or natural mint essence.
- Chocolate variations – Mix in mini chocolate chips into the cupcake batter for extra chocolatey bites.
- Festive twist – Add a sprinkle of green sanding sugar on top of the frosting for St Patrick’s day dessert flair.
- Flavor swap – Turn these into chocolate birthday cupcakes by adding colorful sprinkles inside the batter for a fun surprise.
Serving Suggestions
- I love serving these mint chocolate cupcakes with a hot cup of cocoa—it doubles down on the chocolatey goodness and keeps things cozy.
- Pair them with fresh berries for a bright, refreshing contrast to the rich mint frosting.
- For a St Patrick’s day dessert spread, arrange them on a tiered tray with shamrock-shaped cookies and green candies—it looks festive and fun!
- They’re perfect as chocolate birthday cupcakes too—top each with a candle and watch the smiles light up.
- Enjoy them slightly chilled on a warm day; the frosting gets extra firm and the mint flavor really pops.

Storage and Reheating Instructions
- Room temperature: Store in an airtight container for up to 2 days. Frosted or unfrosted works.
- Refrigerator: Keep in an airtight container for up to 5 days. Bring to room temperature before serving for the best texture.
- Freezer: Cupcakes freeze well unfrosted for up to 3 months. Thaw overnight in the fridge, then frost before serving.
- Reheating: Warm slightly in the microwave for 5–10 seconds to soften the cupcake without melting the frosting.
Frequently Asked Questions
Can I make these cupcakes gluten-free?
Yes! Substitute the all-purpose flour with a 1:1 gluten-free baking flour. The texture may be slightly different, but they’ll still be moist and delicious.
Can I use chocolate chips in the batter?
Absolutely! Fold in ½ cup of mini chocolate chips for extra chocolatey bites. It makes these easy mint chocolate cupcakes even more indulgent.
How strong is the mint flavor?
The peppermint extract gives a refreshing hint of mint without being overpowering. You can adjust the amount to your taste for a milder or stronger flavor.
Can I make these ahead of time?
Yes! The cupcakes can be baked a day or two in advance. Store unfrosted in an airtight container and frost just before serving for the best results.
How do I get smooth, professional-looking frosting?
Use a piping bag with a star tip and frost on fully cooled cupcakes. Beat the frosting until fluffy for smooth swirls that look bakery-perfect.
Can I freeze these cupcakes?
Yes, unfrosted cupcakes freeze well for up to 3 months. Thaw in the fridge overnight, then frost before serving.
Did you try this recipe? Let me know in the comments how it turned out! I’d love to hear your favorite ways to decorate or serve these yummy cupcakes.
Mint Chocolate Cupcakes
Equipment
- Mixing Bowls
- Electric mixer or stand mixer
- Measuring cups and spoons
- Cupcake pan
- Cupcake liners
- Spatula
- Piping Bag + Tip
Ingredients
For the Cupcakes
- 1 cup 125g all-purpose flour
- ¾ cup 75g unsweetened cocoa powder
- 1 tsp baking powder
- ½ tsp baking soda
- ¼ tsp salt
- ½ cup 115g unsalted butter, softened
- 1 cup 200g granulated sugar
- 2 large eggs
- 1 tsp vanilla extract
- ½ cup 120ml buttermilk
- ½ cup 120ml hot water
For the Mint Frosting
- 1 cup 230g unsalted butter, softened
- 3 –4 cups 360–480g powdered sugar
- 2 –3 tbsp heavy cream or milk
- 1 tsp peppermint extract
- Green gel food coloring optional, for festive St Patrick’s day dessert vibes
- Chocolate chips or shavings for topping optional
Instructions
Step 1: Preheat and Prep
- Preheat your oven to 350°F (175°C).
- Line a 12-cup cupcake pan with cupcake liners. I like using parchment paper liners—they make cleanup so much easier and the cupcakes slide out perfectly.
- Lightly spray the liners with non-stick cooking spray for extra insurance against sticking.
- Pro Tip: Make sure your oven is fully preheated before baking—this helps the cupcakes rise evenly.
Step 2: Mix the Dry Ingredients
- In a medium bowl, sift together the flour, cocoa powder, baking powder, baking soda, and salt.
- Whisk everything until fully combined.
- Pro Tip: Sifting the cocoa powder and flour together helps prevent lumps and gives the cupcakes a smoother texture.
Step 3: Cream Butter and Sugar
- In a large mixing bowl, beat the softened butter and sugar together until light and fluffy—about 2–3 minutes with an electric mixer.
- Add the eggs one at a time, mixing well after each addition.
- Stir in the vanilla extract.
- Pro Tip: Don’t rush this step! Properly creamed butter and sugar gives the cupcakes a tender, airy crumb.
Step 4: Combine Wet and Dry Ingredients
- Gradually add the dry ingredients to the butter mixture in three parts, alternating with the buttermilk in two parts.
- Begin and end with the dry ingredients, mixing gently to avoid overmixing.
- Slowly stir in the hot water until fully combined—this makes the batter silky and smooth.
- Pro Tip: Whisk continuously when adding hot water to prevent any lumps and ensure a glossy, smooth batter.
Step 5: Fill Cupcake Liners
- Spoon the batter evenly into the prepared liners, filling each about 2/3 full.
- Gently tap the pan on the counter to remove any air bubbles.
- Pro Tip: Using an ice cream scoop ensures all cupcakes are the same size and bake evenly.
Step 6: Bake
- Bake in the preheated oven for 18–22 minutes, or until a toothpick inserted in the center comes out clean.
- Let the cupcakes cool in the pan for 5 minutes before transferring them to a wire rack to cool completely.
- Pro Tip: Avoid frosting the cupcakes while they’re warm—this can cause the frosting to melt and slide off.
Step 7: Make the Mint Frosting
- Beat the softened butter on medium speed until creamy.
- Gradually add the powdered sugar, 1 cup at a time, mixing on low speed at first.
- Add the peppermint extract, heavy cream (or milk), and green gel food coloring. Beat on high until light, fluffy, and smooth.
- Pro Tip: Taste the frosting before coloring—you can adjust the mint to your preference.
Step 8: Frost the Cupcakes
- Transfer the frosting into a piping bag fitted with your favorite tip.
- Pipe generous swirls of frosting onto the cooled cupcakes.
- Optional: sprinkle chocolate shavings or chips on top for extra chocolatey goodness.
Notes
Nutritional Value (per cupcake, approximate)
- Calories: 280 kcal
- Fat: 14 g
- Saturated Fat: 8 g
- Carbohydrates: 36 g
- Sugars: 25 g
- Protein: 3 g
- Fiber: 2 g
- Sodium: 150 mg