Mint Chocolate Brownies
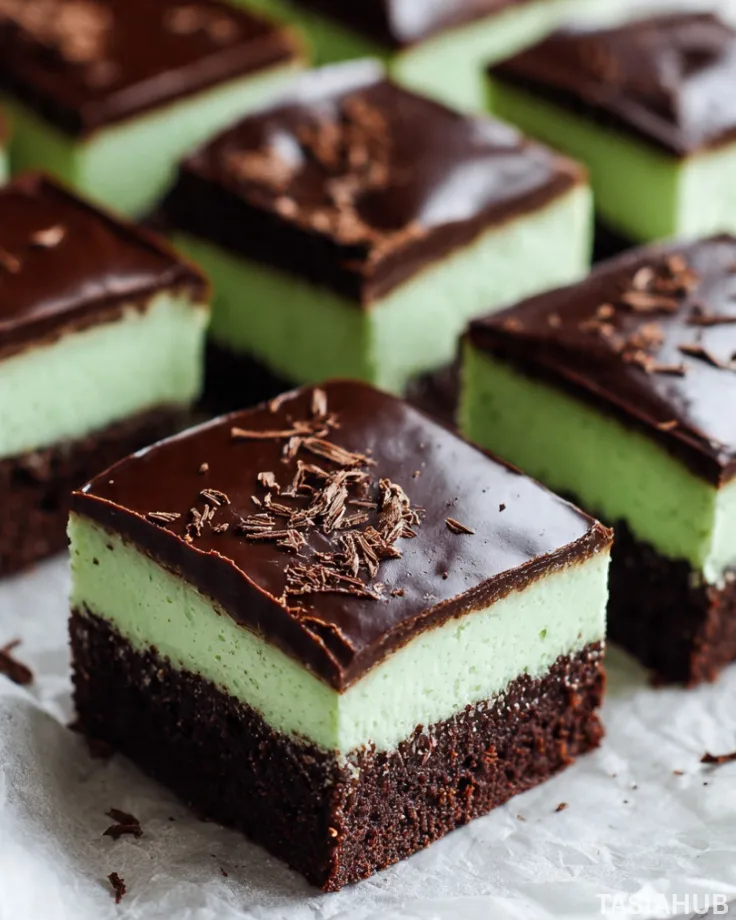
Chocolate brownies already feel like a treat worth slowing down for, but adding mint takes them to another level entirely. These mint chocolate brownies strike that perfect balance between rich, fudgy chocolate and a cool, refreshing mint flavor that lingers just enough without overpowering the cocoa. Each bite feels indulgent yet surprisingly light, making them hard to stop at just one square.
What makes this recipe special is how approachable it is. You don’t need fancy techniques or hard-to-find ingredients to create easy mint brownies that taste bakery-worthy. With a simple brownie base and a smooth mint layer, the flavors come together effortlessly, giving you homemade brownies with mint that look impressive but feel stress-free to make.
These brownies also shine as a seasonal favorite. Their green-tinted mint layer makes them a natural fit for a St Patrick’s Day dessert, whether you’re hosting friends, baking for family, or just leaning into the festive mood at home. At the same time, they’re versatile enough to enjoy year-round whenever a mint chocolate dessert craving hits.
If you love desserts that feel both classic and a little playful, this is one you’ll come back to again and again. From the soft, chewy texture to the refreshing finish, these mint brownies have all the qualities people look for in the best mint brownies—comforting, flavorful, and made to be shared… or quietly enjoyed straight from the pan.
Why You’ll Love It
- The flavor combo is perfectly balanced – The deep chocolate base stays rich and fudgy, while the mint layer adds a cool, refreshing contrast that keeps every bite from feeling too heavy.
- It feels special without being complicated – These easy mint brownies look like something from a bakery display, yet they come together with simple steps and everyday ingredients.
- Great for both everyday treats and celebrations – Whether you’re baking for a cozy weekend dessert or putting together a St Patrick’s Day dessert spread, these brownies fit right in without needing any tweaks.
- They slice beautifully and hold their shape – No crumbling or mess here. You get clean, neat squares that are perfect for sharing, gifting, or serving at gatherings.
- A guaranteed crowd-pleaser – Even people who aren’t usually into mint desserts tend to fall in love with the rich, chocolate-forward taste paired with that subtle mint finish.
Ingredient List
For the Brownies
- 1 cup unsalted butter, melted
- 1 ¼ cups granulated sugar
- ¾ cup brown sugar
- 3 large eggs
- 1 teaspoon vanilla extract
- ¾ cup unsweetened cocoa powder
- 1 cup all-purpose flour
- ½ teaspoon salt
For the Mint Layer
- ½ cup unsalted butter, softened
- 2 cups powdered sugar
- 1–2 teaspoons peppermint extract
- 1–2 tablespoons milk or heavy cream
- Green food coloring (optional)
For the Chocolate Topping
- 1 cup semi-sweet chocolate chips
- ¼ cup heavy cream
Ingredient Notes
- Cocoa powder – Go for a good-quality unsweetened cocoa powder. I usually use a rich Dutch-processed one because it gives the brownies that deep, chocolatey flavor that really stands out.
- Peppermint extract – A little goes a long way. Start with 1 teaspoon, taste, then adjust. Too much can overpower the brownies instead of complementing them.
- Butter – Real butter is non-negotiable here. It keeps the brownies fudgy and makes the mint layer extra smooth.
- Powdered sugar – Don’t skip sifting this if it’s clumpy. It helps the mint layer spread evenly and keeps the texture silky instead of grainy.
- Chocolate chips – Semi-sweet works best to balance the sweetness of the mint layer. I always use a brand I trust for melting smoothly—it makes the topping glossy and irresistible.
- Food coloring – Totally optional, but a tiny drop gives that classic mint look, especially if you’re serving these as a festive St Patrick’s Day dessert.
Kitchen Equipment Needed
- 9×13-inch baking pan – Gives the brownies the perfect thickness without drying them out. I love using a metal pan for cleaner edges.
- Mixing bowls – One for the brownie batter and one for the mint layer. I usually grab medium glass bowls so I can see everything mix evenly.
- Whisk – Great for smoothing out the batter and avoiding lumps, especially when mixing in the cocoa powder.
- Rubber spatula – Makes folding and spreading super easy. This is my go-to for getting every last bit of batter out of the bowl.
- Electric mixer or hand mixer – Helps the mint layer turn light and creamy without a workout for your arm.
- Measuring cups and spoons – Accuracy matters here, especially with the peppermint extract.
- Saucepan or microwave-safe bowl – Used to melt the chocolate topping smoothly without scorching it.
- Parchment paper – Optional, but highly recommended for easy lifting and clean cuts once the brownies are set.
Instructions
1. Prepare the Pan and Oven
- Preheat your oven to 350°F (175°C).
- Line a 9×13-inch baking pan with parchment paper, leaving a little overhang on the sides for easy lifting later.
- Lightly grease the parchment to prevent sticking.
Pro tip: Let the parchment crease naturally into the corners—this helps the brownies bake evenly instead of puffing up at the edges.
2. Make the Brownie Batter
- In a large mixing bowl, whisk together the melted butter, granulated sugar, and brown sugar until smooth and glossy.
- Add the eggs one at a time, whisking well after each addition.
- Stir in the vanilla extract until fully combined.
- Sift in the cocoa powder, flour, and salt.
- Gently whisk until just combined and no dry streaks remain.
Pro tip: Stop mixing as soon as the batter comes together. Overmixing can make the brownies dense instead of fudgy.
3. Bake the Brownies
- Pour the batter into the prepared pan.
- Use a spatula to spread it evenly into the corners.
- Bake for 22–28 minutes, or until the center is set and a toothpick comes out with a few moist crumbs.
- Remove from the oven and let the brownies cool completely in the pan.
Pro tip: Slightly underbaked brownies set as they cool and stay ultra-fudgy.
4. Make the Mint Layer
- In a clean bowl, beat the softened butter until creamy.
- Gradually add the powdered sugar, mixing on low speed.
- Add the peppermint extract and milk or cream.
- Beat until smooth and spreadable.
- Mix in a tiny drop of green food coloring if using.
- Spread the mint layer evenly over the cooled brownies.
Pro tip: If the mint layer feels too thick, add milk one teaspoon at a time until it spreads easily.
5. Add the Chocolate Topping
- Heat the heavy cream until just warm (not boiling).
- Pour it over the chocolate chips and let sit for 2–3 minutes.
- Stir gently until smooth and glossy.
- Pour the chocolate topping over the mint layer and spread evenly.
Pro tip: Stir slowly from the center outward to prevent air bubbles and keep the topping silky.
6. Chill, Slice, and Serve
- Refrigerate the brownies for at least 1 hour, or until fully set.
- Lift them out of the pan using the parchment overhang.
- Slice into squares with a sharp knife.
- Serve chilled or at room temperature.
Pro tip: Wipe the knife clean between cuts for sharp, bakery-style edges.
Tips and Tricks for Success
- Let each layer fully cool before moving on – This keeps the mint layer from melting into the brownies and helps the chocolate topping set cleanly.
- Measure peppermint extract carefully – Mint is powerful. It’s much easier to add more than to fix an overpowering mint flavor.
- Use room-temperature ingredients for the mint layer – Soft butter blends smoothly and prevents a grainy texture.
- Chill before slicing – Cold brownies cut cleaner and hold their layers better.
- Store leftovers in the fridge – The flavors deepen after a few hours, making these mint brownies even better the next day.
Ingredient Substitutions and Variations
- Butter substitute – Use dairy-free butter if needed; just make sure it’s one that bakes well for the brownie base.
- Chocolate swap – Dark chocolate chips can be used for a deeper, less sweet topping.
- Mint flavor adjustment – Swap peppermint extract for mint extract if you prefer a softer, less sharp mint taste.
- No food coloring – Skip it completely for a more natural look—the flavor stays exactly the same.
- Extra chocolate twist – Add chocolate chips or chopped chocolate to the brownie batter for even more richness.
- Holiday variation – Sprinkle crushed chocolate mints or Andes pieces on top before chilling for a festive finish.
Serving Suggestions
- Classic dessert plate – Serve chilled squares on their own with a cup of tea or coffee. I love this as a quiet evening treat when I want something sweet but not too heavy.
- With ice cream – Pair a brownie with vanilla ice cream for a creamy contrast that makes the mint flavor pop even more.
- Party-style platter – Cut into smaller squares and arrange on a tray for gatherings or holidays. They always disappear fast at parties.
- After-dinner treat – Serve slightly chilled after a rich meal—the minty finish feels refreshing and satisfying.
- Dessert box or gift – Wrap individual pieces for gifting. I’ve done this for friends, and they’re always impressed by the layered look.
Storage and Reheating Instructions
- Refrigerator storage – Store brownies in an airtight container in the fridge for up to 5 days.
- Freezing – Wrap individual slices tightly and freeze for up to 2 months. Thaw overnight in the fridge before serving.
- Room temperature – If serving the same day, they can sit out for a few hours without issue.
- Reheating – These are best enjoyed chilled or at room temperature, but if you prefer them slightly warm, microwave for 5–8 seconds only.
- Make-ahead tip – These brownies actually taste better after a few hours in the fridge, making them perfect for prepping ahead.
Frequently Asked Questions
Can I make these brownies ahead of time?
Absolutely. These mint chocolate brownies are actually better after chilling for a few hours. You can make them a day in advance and keep them stored in the fridge until you’re ready to serve.
How strong is the mint flavor?
It’s balanced and refreshing, not overpowering. If you’re sensitive to mint, start with less peppermint extract and add more gradually until it tastes just right to you.
Do I need to use food coloring?
Not at all. The green color is purely for looks, especially if you’re serving this as a St Patrick’s Day dessert. The flavor stays the same without it.
Can I use a boxed brownie mix?
Yes, if you’re short on time. A fudgy boxed mix works well as the base—just prepare it according to the package instructions before adding the mint and chocolate layers.
How do I get clean, neat slices?
Chill the brownies fully and use a sharp knife wiped clean between cuts. This keeps the layers crisp and bakery-worthy.
Are these brownies freezer-friendly?
They are. Wrap individual pieces tightly and freeze for up to two months. Thaw in the fridge for best texture and flavor.
Did you try this recipe? Let me know in the comments how it turned out, or share your favorite twist on these mint brownies—I’d love to hear from you!
Mint Chocolate Brownies
Equipment
- 9×13-inch Baking Pan
- Mixing Bowls
- Whisk
- Rubber spatula
- Electric mixer or hand mixer
- Measuring cups and spoons
- Saucepan or microwave-safe bowl
- Parchment paper
Ingredients
For the Brownies
- 1 cup unsalted butter melted
- 1 ¼ cups granulated sugar
- ¾ cup brown sugar
- 3 large eggs
- 1 teaspoon vanilla extract
- ¾ cup unsweetened cocoa powder
- 1 cup all-purpose flour
- ½ teaspoon salt
For the Mint Layer
- ½ cup unsalted butter softened
- 2 cups powdered sugar
- 1 –2 teaspoons peppermint extract
- 1 –2 tablespoons milk or heavy cream
- Green food coloring optional
For the Chocolate Topping
- 1 cup semi-sweet chocolate chips
- ¼ cup heavy cream
Instructions
Prepare the Pan and Oven
- Preheat your oven to 350°F (175°C).
- Line a 9×13-inch baking pan with parchment paper, leaving a little overhang on the sides for easy lifting later.
- Lightly grease the parchment to prevent sticking.
- Pro tip: Let the parchment crease naturally into the corners—this helps the brownies bake evenly instead of puffing up at the edges.
Make the Brownie Batter
- In a large mixing bowl, whisk together the melted butter, granulated sugar, and brown sugar until smooth and glossy.
- Add the eggs one at a time, whisking well after each addition.
- Stir in the vanilla extract until fully combined.
- Sift in the cocoa powder, flour, and salt.
- Gently whisk until just combined and no dry streaks remain.
- Pro tip: Stop mixing as soon as the batter comes together. Overmixing can make the brownies dense instead of fudgy.
Bake the Brownies
- Pour the batter into the prepared pan.
- Use a spatula to spread it evenly into the corners.
- Bake for 22–28 minutes, or until the center is set and a toothpick comes out with a few moist crumbs.
- Remove from the oven and let the brownies cool completely in the pan.
- Pro tip: Slightly underbaked brownies set as they cool and stay ultra-fudgy.
Make the Mint Layer
- In a clean bowl, beat the softened butter until creamy.
- Gradually add the powdered sugar, mixing on low speed.
- Add the peppermint extract and milk or cream.
- Beat until smooth and spreadable.
- Mix in a tiny drop of green food coloring if using.
- Spread the mint layer evenly over the cooled brownies.
- Pro tip: If the mint layer feels too thick, add milk one teaspoon at a time until it spreads easily.
Add the Chocolate Topping
- Heat the heavy cream until just warm (not boiling).
- Pour it over the chocolate chips and let sit for 2–3 minutes.
- Stir gently until smooth and glossy.
- Pour the chocolate topping over the mint layer and spread evenly.
- Pro tip: Stir slowly from the center outward to prevent air bubbles and keep the topping silky.
Chill, Slice, and Serve
- Refrigerate the brownies for at least 1 hour, or until fully set.
- Lift them out of the pan using the parchment overhang.
- Slice into squares with a sharp knife.
- Serve chilled or at room temperature.
- Pro tip: Wipe the knife clean between cuts for sharp, bakery-style edges.
Notes
Nutritional Value (per serving, approximate):
- Calories: 320 kcal
- Carbohydrates: 38 g
- Protein: 4 g
- Fat: 18 g
- Saturated Fat: 11 g
- Cholesterol: 70 mg
- Sugar: 30 g
- Fiber: 2 g
- Sodium: 180 mg