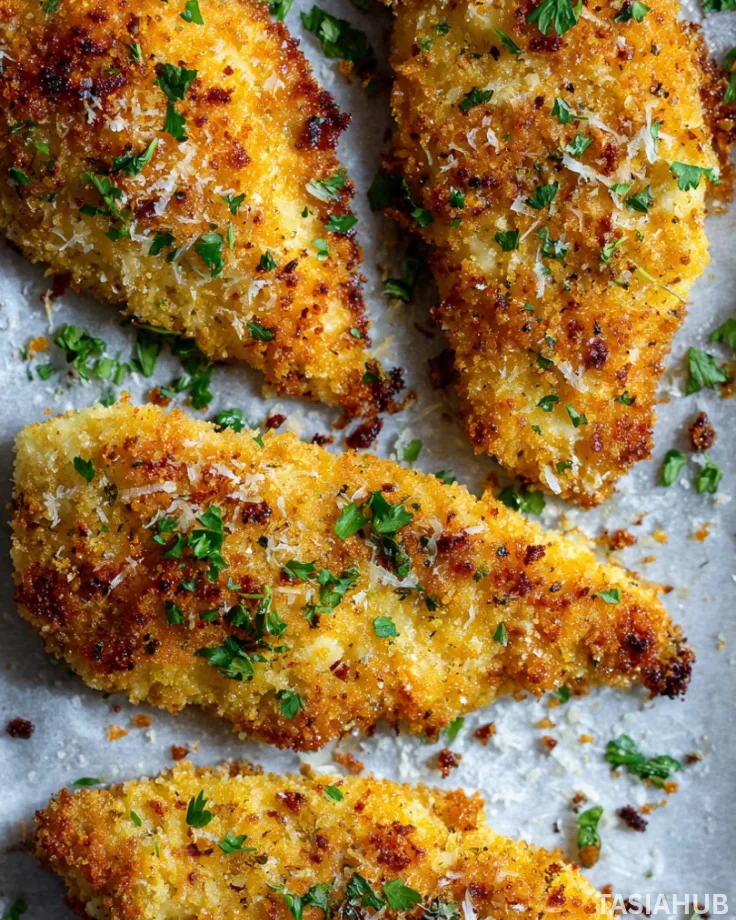
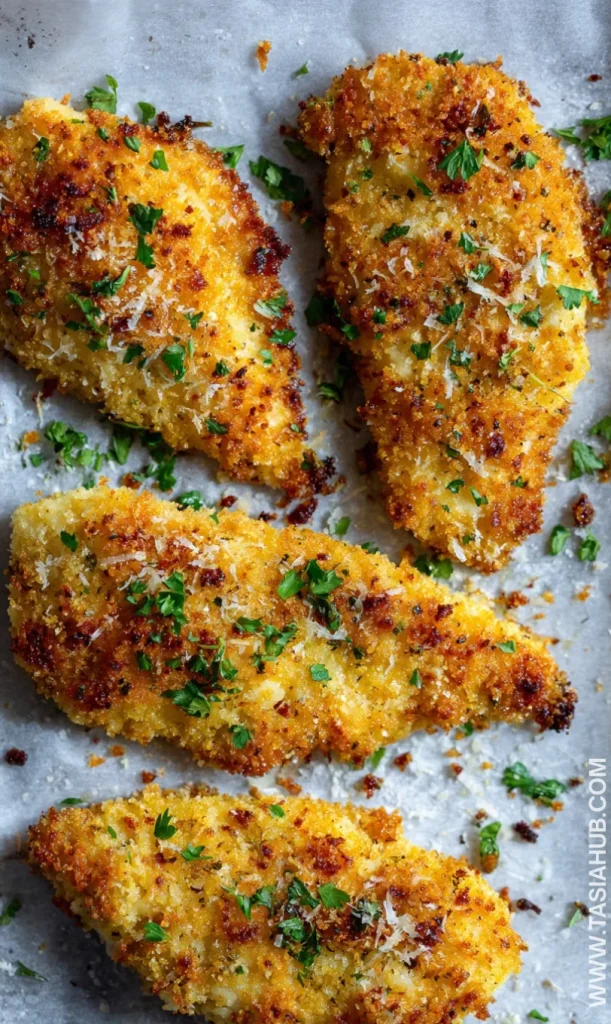
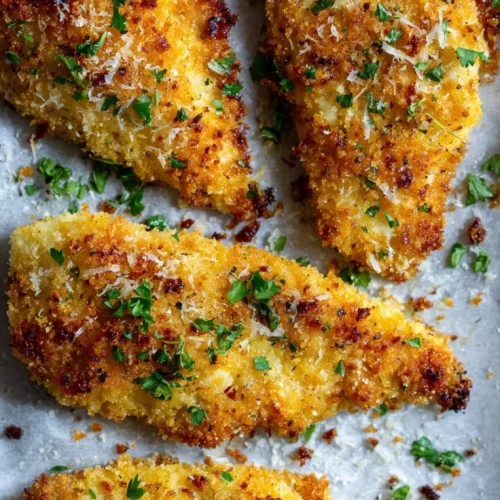
Homemade Shake and Bake Chicken
Making shake and bake chicken at home feels a little nostalgic, but the results are even better than the boxed version. You get that golden, crunchy coating and juicy chicken inside—without preservatives or mystery ingredients. Plus, it’s surprisingly easy to pull together with pantry staples you probably already have.
This copycat shake and bake approach lets you control the flavors, from savory herbs to a hint of spice. Once you learn how to make shake N bake from scratch, you’ll realize how flexible it is. You can tweak the seasoning to match your mood, whether that’s classic comfort food vibes or something with a bit more kick.
One of my favorite things about this shake N bake recipe is how hands-off it feels. Toss everything into a bag, give it a good shake, and let the oven do the rest. The chicken bakes up beautifully crisp, making it perfect for busy weeknights or casual family dinners when you still want something satisfying.
If you love crispy shake and bake chicken with that unmistakable crunch, this homemade version delivers every time. It’s proof that shake and bake chicken doesn’t need to come from a box to taste amazing—and once you try it, you may never go back.
Why You’ll Love It
- Big crunch without deep frying – You get that classic crispy coating using the oven, so the chicken turns out golden and crunchy without standing over hot oil.
- Simple pantry ingredients – No specialty items here. Everything comes together with everyday spices and breadcrumbs you likely already have on hand.
- Customizable flavors – Love it herby, smoky, or a little spicy? This recipe is easy to adjust so you can make it exactly the way your family enjoys it.
- Minimal prep, minimal mess – The shake-and-coat method keeps cleanup easy, which makes this recipe perfect for busy weeknights.
- Family-friendly and reliable – It’s a meal that both kids and adults love, and it comes out deliciously crispy every single time.
Ingredient List
For the Chicken
- 4 bone-in, skin-on chicken pieces (or boneless, skinless if preferred)
For the Homemade Shake and Bake Coating
- 1 cup breadcrumbs
- ½ cup grated Parmesan cheese
- 1 teaspoon salt
- 1 teaspoon paprika
- ½ teaspoon garlic powder
- ½ teaspoon onion powder
- ½ teaspoon dried thyme
- ½ teaspoon dried parsley
- ¼ teaspoon black pepper
For Coating
- 2 tablespoons olive oil or melted butter
Ingredient Notes
- Breadcrumbs – I always use plain breadcrumbs so the seasoning really shines. Panko works too if you want extra crunch.
- Parmesan cheese – Don’t skip this! It adds a savory, salty bite and helps the coating turn beautifully golden.
- Paprika – This gives the chicken that classic color and a subtle smoky flavor. Smoked paprika is amazing here if you have it.
- Olive oil or butter – This helps the coating stick and crisp up in the oven. Butter adds richer flavor, while olive oil keeps things a bit lighter.
- Chicken pieces – Bone-in stays juicier, but boneless cooks faster. Use what fits your schedule—this recipe works with both.
Kitchen Equipment Needed
- Mixing bowl – For combining all the shake and bake seasonings. I love using a large glass bowl; it makes shaking easier.
- Resealable plastic bag – Perfect for tossing chicken with the coating evenly. I always use a sturdy quart-size bag.
- Baking sheet – To bake the chicken to crispy perfection. Lined with parchment for easy cleanup.
- Wire rack (optional) – Placed on the baking sheet to let air circulate around the chicken for extra crunch.
- Measuring cups and spoons – For precise seasoning amounts. A must for consistent flavor.
- Oven mitts – For safely handling hot trays straight from the oven.
Instructions
Step 1: Prepare the Coating
- Take a large mixing bowl.
- Add 1 cup breadcrumbs to the bowl.
- Sprinkle in ½ cup grated Parmesan cheese.
- Add 1 teaspoon salt, 1 teaspoon paprika, ½ teaspoon garlic powder, ½ teaspoon onion powder, ½ teaspoon dried thyme, ½ teaspoon dried parsley, and ¼ teaspoon black pepper.
- Use a whisk or fork to mix all the ingredients thoroughly until they are evenly combined.
Pro Tip: Mixing the seasoning first ensures every piece of chicken gets coated evenly.
Step 2: Prepare the Chicken
- Pat each chicken piece dry with paper towels.
- Place the chicken in a clean bowl or plate.
- Brush or drizzle 2 tablespoons olive oil or melted butter evenly over each chicken piece.
- Rub the oil or butter all over the chicken so the coating will stick properly.
Pro Tip: Dry chicken allows the coating to stick better and helps achieve that crispy shake and bake texture.
Step 3: Coat the Chicken
- Open a large resealable plastic bag.
- Add a few chicken pieces to the bag (do not overcrowd).
- Spoon in about half of the coating mixture.
- Seal the bag tightly.
- Shake the bag gently but thoroughly so every piece of chicken is evenly coated.
- Remove the chicken from the bag and place it on a plate or tray.
- Repeat with remaining chicken and coating.
Pro Tip: Shake gently to prevent coating from falling off, but make sure all sides are covered.
Step 4: Arrange Chicken for Baking
- Line a baking sheet with parchment paper.
- (Optional) Place a wire rack on top of the baking sheet for extra crispiness.
- Arrange the coated chicken pieces on the baking sheet or wire rack, leaving space between each piece.
- Check that the coating is evenly covering each piece; press lightly if needed.
Pro Tip: Air circulation around the chicken helps it get crispy all over.
Step 5: Bake the Chicken
- Preheat your oven to 400°F (200°C) only after the chicken is coated and ready to bake.
- Place the baking sheet with chicken in the center of the oven.
- Bake for 35–45 minutes for bone-in pieces, or 25–30 minutes for boneless, until the chicken reaches an internal temperature of 165°F (74°C) and the coating is golden brown.
- Halfway through baking, check the chicken. If needed, rotate the baking sheet for even cooking.
Pro Tip: Avoid opening the oven too often, as this lowers the temperature and can prevent the coating from crisping properly.
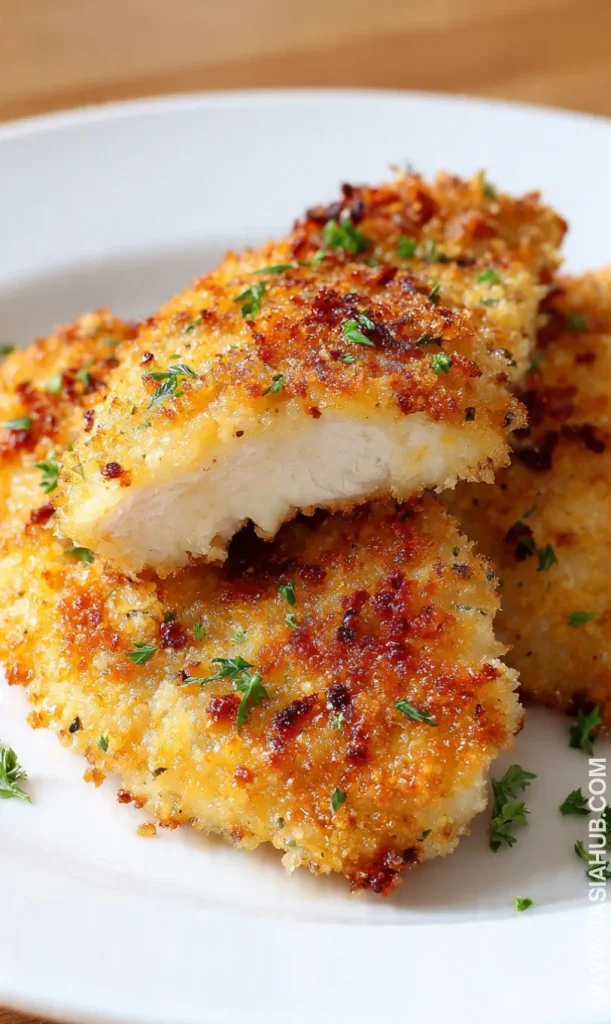
Step 6: Rest and Serve
- Remove the chicken from the oven carefully using oven mitts.
- Let the chicken rest for 5 minutes on the baking sheet before serving.
- Serve warm with your favorite sides.
Pro Tip: Resting allows juices to redistribute so the chicken stays moist inside while the outside remains crispy.
Tips and Tricks for Success
- Pat chicken dry – Moisture prevents the coating from sticking properly, so always blot the chicken before adding oil.
- Don’t overcrowd the pan – Leaving space between pieces ensures even baking and maximum crispiness.
- Use a wire rack if possible – This allows air to circulate under the chicken, making it extra crunchy.
- Shake gently but thoroughly – Too much force can knock off the coating, but gentle shaking ensures full coverage.
- Check internal temperature – Use a meat thermometer to make sure chicken reaches 165°F (74°C) for safe, juicy results.
- Let it rest – Resting keeps the inside moist while the outside stays crisp.
Ingredient Substitutions and Variations
- Breadcrumbs – Swap plain breadcrumbs for panko to get an even crunchier coating.
- Parmesan cheese – Grated Asiago or Pecorino Romano works if you want a slightly different cheesy flavor.
- Herbs and spices – Try smoked paprika, Italian seasoning, or cayenne for a flavor twist.
- Chicken pieces – Boneless works for quicker cooking, wings for snack-sized portions.
- Oil or butter – Coconut oil or avocado oil can be used for a different flavor or healthier option.
- Gluten-free – Use gluten-free breadcrumbs to make this recipe safe for those avoiding gluten.
Serving Suggestions
- I love serving this shake and bake chicken with roasted garlic mashed potatoes and steamed green beans—it’s the ultimate cozy dinner.
- Pair it with a crisp Caesar salad and warm dinner rolls for a simple weeknight meal everyone enjoys.
- For a lighter option, serve alongside quinoa and roasted vegetables—the crunch of the chicken makes it extra satisfying.
- It’s perfect for a casual family dinner with buttery corn on the cob and a side of coleslaw.
- Slice leftover chicken over a fresh garden salad for a quick and flavorful lunch the next day.
Storage and Reheating Instructions
- Refrigerate – Store leftover chicken in an airtight container for up to 3–4 days.
- Freeze – Wrap cooled chicken tightly in foil or plastic wrap and freeze for up to 2 months.
- Reheat in the oven – Preheat oven to 375°F (190°C) and bake chicken for 10–15 minutes until heated through and crispy.
- Microwave option – Microwave on a microwave-safe plate for 1–2 minutes, but note the coating may soften slightly.
- Avoid soggy coating – To restore crispiness after refrigerating, reheat on a wire rack in the oven rather than directly on a baking sheet.
Frequently Asked Questions
Can I use boneless chicken for this recipe?
Absolutely! Boneless chicken cooks faster, usually in 25–30 minutes, and still gets crispy with this shake and bake coating.
Can I make this gluten-free?
Yes! Simply swap regular breadcrumbs for gluten-free breadcrumbs. Panko-style gluten-free crumbs work best for extra crunch.
How do I keep the coating from falling off?
Pat the chicken dry, coat with a little oil or melted butter, and shake gently. Using a wire rack while baking also helps the coating stick.
Can I add more flavor to the coating?
Definitely! Try adding smoked paprika, cayenne, or Italian seasoning. You can even mix in a little lemon zest for a fresh twist.
Can I prepare this ahead of time?
Yes! Coat the chicken and store it in the fridge for up to 24 hours before baking. Just bake it straight from the fridge—no need to let it come to room temperature.
How do I reheat leftovers without losing the crispiness?
Reheat in a preheated oven at 375°F (190°C) on a wire rack for 10–15 minutes. Avoid microwaving if you want to keep the coating crunchy.
Did you try this recipe? Let me know in the comments how it turned out!
Homemade Shake and Bake Chicken
Equipment
- Mixing Bowl
- Resealable plastic bag
- Baking Sheet
- Wire rack (optional)
- Measuring cups and spoons
- Oven Mitts
Ingredients
For the Chicken
- 4 bone-in skin-on chicken pieces (or boneless, skinless if preferred)
For the Homemade Shake and Bake Coating
- 1 cup breadcrumbs
- ½ cup grated Parmesan cheese
- 1 teaspoon salt
- 1 teaspoon paprika
- ½ teaspoon garlic powder
- ½ teaspoon onion powder
- ½ teaspoon dried thyme
- ½ teaspoon dried parsley
- ¼ teaspoon black pepper
For Coating
- 2 tablespoons olive oil or melted butter
Instructions
Step 1: Prepare the Coating
- Take a large mixing bowl.
- Add 1 cup breadcrumbs to the bowl.
- Sprinkle in ½ cup grated Parmesan cheese.
- Add 1 teaspoon salt, 1 teaspoon paprika, ½ teaspoon garlic powder, ½ teaspoon onion powder, ½ teaspoon dried thyme, ½ teaspoon dried parsley, and ¼ teaspoon black pepper.
- Use a whisk or fork to mix all the ingredients thoroughly until they are evenly combined.
- Pro Tip: Mixing the seasoning first ensures every piece of chicken gets coated evenly.
Step 2: Prepare the Chicken
- Pat each chicken piece dry with paper towels.
- Place the chicken in a clean bowl or plate.
- Brush or drizzle 2 tablespoons olive oil or melted butter evenly over each chicken piece.
- Rub the oil or butter all over the chicken so the coating will stick properly.
- Pro Tip: Dry chicken allows the coating to stick better and helps achieve that crispy shake and bake texture.
Step 3: Coat the Chicken
- Open a large resealable plastic bag.
- Add a few chicken pieces to the bag (do not overcrowd).
- Spoon in about half of the coating mixture.
- Seal the bag tightly.
- Shake the bag gently but thoroughly so every piece of chicken is evenly coated.
- Remove the chicken from the bag and place it on a plate or tray.
- Repeat with remaining chicken and coating.
- Pro Tip: Shake gently to prevent coating from falling off, but make sure all sides are covered.
Step 4: Arrange Chicken for Baking
- Line a baking sheet with parchment paper.
- (Optional) Place a wire rack on top of the baking sheet for extra crispiness.
- Arrange the coated chicken pieces on the baking sheet or wire rack, leaving space between each piece.
- Check that the coating is evenly covering each piece; press lightly if needed.
- Pro Tip: Air circulation around the chicken helps it get crispy all over.
Step 5: Bake the Chicken
- Preheat your oven to 400°F (200°C) only after the chicken is coated and ready to bake.
- Place the baking sheet with chicken in the center of the oven.
- Bake for 35–45 minutes for bone-in pieces, or 25–30 minutes for boneless, until the chicken reaches an internal temperature of 165°F (74°C) and the coating is golden brown.
- Halfway through baking, check the chicken. If needed, rotate the baking sheet for even cooking.
- Pro Tip: Avoid opening the oven too often, as this lowers the temperature and can prevent the coating from crisping properly.
Step 6: Rest and Serve
- Remove the chicken from the oven carefully using oven mitts.
- Let the chicken rest for 5 minutes on the baking sheet before serving.
- Serve warm with your favorite sides.
- Pro Tip: Resting allows juices to redistribute so the chicken stays moist inside while the outside remains crispy.
Notes
Nutritional Value (per serving, approximate):
- Calories: 350–400 kcal
- Protein: 30 g
- Carbohydrates: 12 g
- Fat: 22 g
- Fiber: 1–2 g
- Sodium: 600 mg
- Sugars: 1 g