Green Velvet Cake
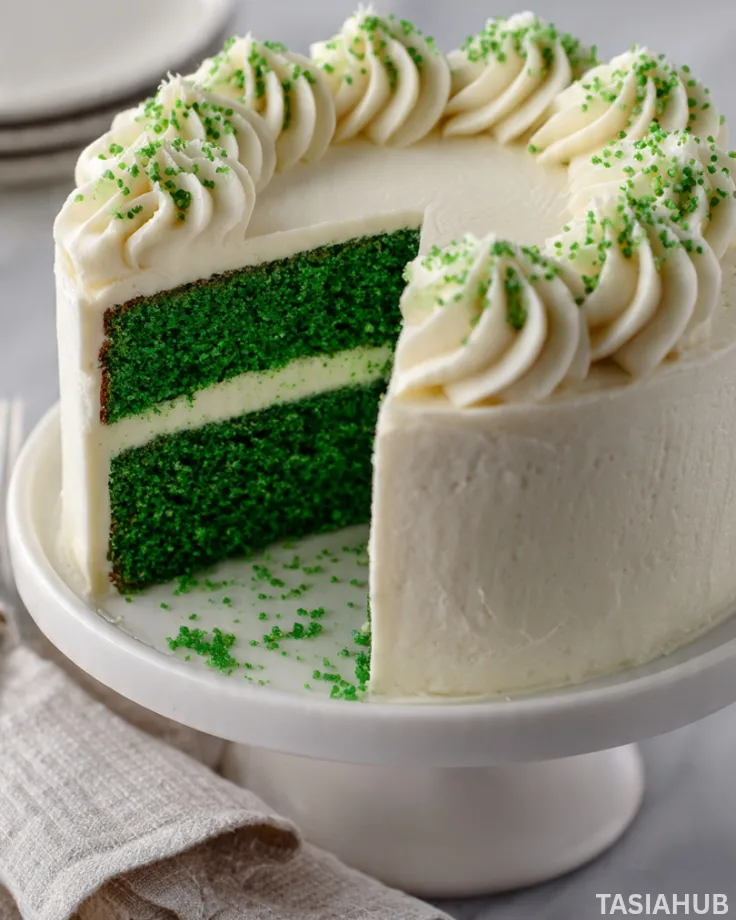
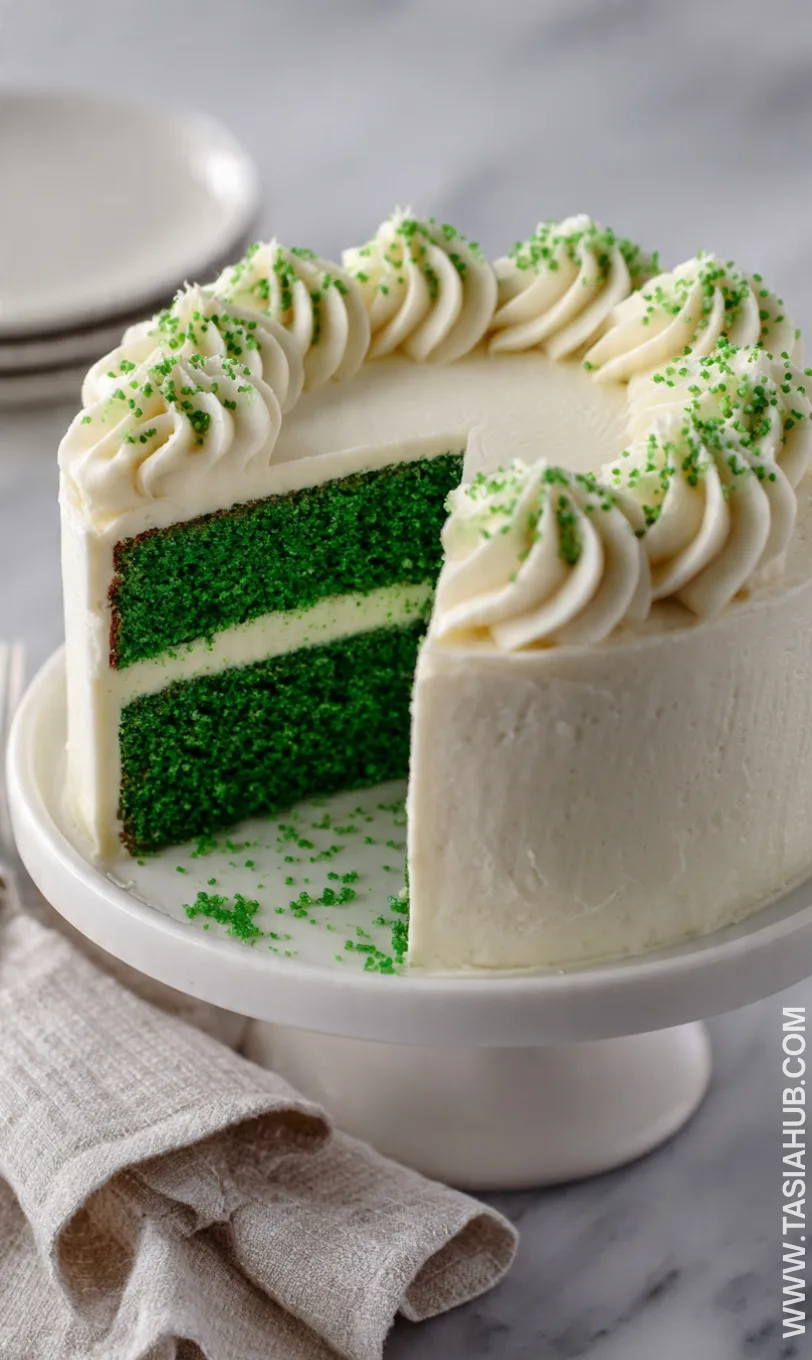
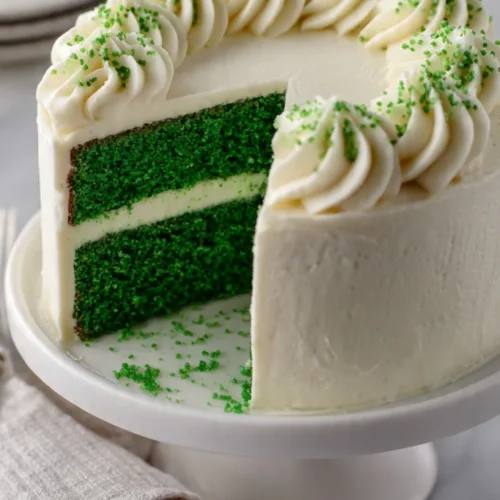
When it comes to festive desserts, few things are as eye-catching and fun as a green velvet cake. Perfect for celebrations that call for a pop of color, this cake transforms an ordinary gathering into a memorable occasion. Its vibrant green hue and tender crumb make it stand out, whether you’re planning a St Patrick’s day dessert spread or simply want to surprise someone on their birthday with a green birthday cake.
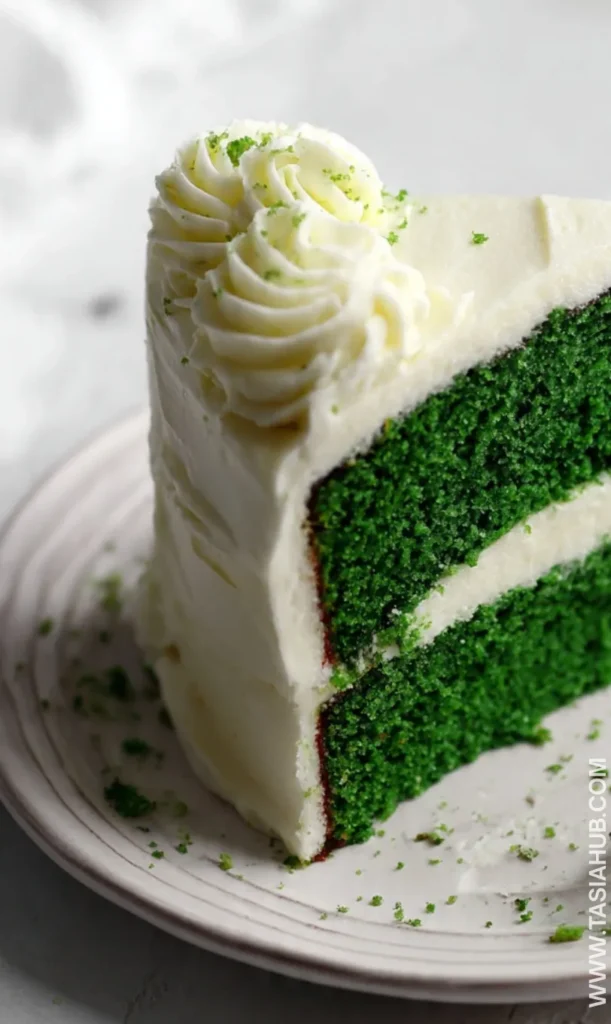
What makes this cake truly special is its texture. The layers are incredibly soft and fluffy, making it a moist green cake that practically melts in your mouth. Unlike some desserts that rely solely on flavor, this cake offers both visual appeal and taste, so it’s just as delightful to look at as it is to enjoy. Decorating it is also a joy—you can keep it simple with a classic cream cheese frosting or get creative with sprinkles, edible glitter, or themed toppers.
One of my favorite things about this recipe is how approachable it is. You don’t need fancy tools or ingredients to make a homemade green cake that tastes like it came straight from a bakery. Mixing, baking, and frosting this cake is straightforward, and the result is a show-stopping dessert that’s perfect for sharing with friends and family.
Whether you’re hosting a holiday party, celebrating a birthday, or just treating yourself to a green dessert, this green velvet cake hits all the right notes. It’s festive, indulgent, and the kind of treat that makes people come back for seconds. Once you try it, you’ll see why it’s becoming a go-to for special occasions.
Why You’ll Love It
- Vibrant and festive: The rich green color makes this cake a showstopper at any celebration, from St Patrick’s day dessert tables to themed birthday parties. Everyone will be drawn to it before they even take a bite!
- Moist and tender layers: Unlike some cakes that can feel dry, this green velvet cake stays soft and moist, making every slice feel indulgent and comforting.
- Perfect for homemade creativity: Whether you frost it simply with cream cheese or add fun decorations, this homemade green cake lets you put a personal touch on every layer.
- Versatile for any occasion: It’s not just for holidays—this cake doubles as a unique green birthday cake or a delightful green dessert whenever you want to surprise guests.
- A crowd-pleaser: Between its color, texture, and flavor, this cake is one of those rare desserts that appeals to both kids and adults alike. You’ll see smiles all around when it’s served.
Ingredient List
For the Cake
- 2 ½ cups all-purpose flour
- 2 cups granulated sugar
- 1 teaspoon baking powder
- 1 teaspoon baking soda
- ½ teaspoon salt
- 1 teaspoon cocoa powder
- 1 cup buttermilk, room temperature
- 1 cup vegetable oil
- 4 large eggs, room temperature
- 2 tablespoons green food coloring
- 1 teaspoon vanilla extract
- 1 teaspoon white vinegar
For the Frosting
- 8 oz cream cheese, softened
- ½ cup unsalted butter, softened
- 4 cups powdered sugar
- 1 teaspoon vanilla extract
Ingredient Notes
- I always use Daisy cream cheese for frosting—it adds such a smooth, tangy flavor.
- Don’t skip the cocoa powder! It’s subtle, but it enhances the depth of the green velvet flavor.
- Buttermilk is key for a moist green cake—it keeps the layers tender and soft.
- Use a good-quality green food coloring; it makes the cake beautifully vibrant without tasting artificial.
- White vinegar might feel unusual, but it reacts with the baking soda to give the cake its perfect lift.
Kitchen Equipment Needed
- Mixing bowls – For combining all your wet and dry ingredients. I love using a large glass bowl because it’s easy to see everything.
- Electric mixer – Makes whipping the frosting and batter smooth a breeze. Hand mixers work too if that’s what you have!
- Measuring cups and spoons – Essential for accurate ingredients, especially with baking. I swear by my stainless steel set—it lasts forever.
- 8-inch round cake pans – Perfect for even layers. Nonstick pans help the cake release cleanly.
- Spatula – Great for scraping down the sides and folding in ingredients. Silicone is my favorite.
- Cooling racks – To cool your layers evenly before frosting. They prevent soggy bottoms!
- Oven thermometer – Optional but helpful to make sure your oven isn’t running hot or cold.
Instructions
Step 1: Prep Your Oven and Pans
- Preheat your oven to 350°F (175°C).
- Grease two 8-inch round cake pans with butter or nonstick spray, then lightly dust with flour.
- Pro tip: Line the bottom with parchment paper for extra-easy cake release.
Step 2: Mix the Dry Ingredients
- In a large mixing bowl, sift together 2 ½ cups flour, 2 cups sugar, 1 teaspoon baking powder, 1 teaspoon baking soda, ½ teaspoon salt, and 1 teaspoon cocoa powder.
- Whisk lightly to combine evenly.
- Pro tip: Sifting helps prevent lumps and makes your cake texture ultra-smooth.
Step 3: Combine the Wet Ingredients
- In another bowl, whisk 1 cup buttermilk, 1 cup vegetable oil, 4 eggs, 2 tablespoons green food coloring, 1 teaspoon vanilla extract, and 1 teaspoon white vinegar until smooth.
- Make sure the eggs are fully blended, and the color is even.
Step 4: Combine Wet and Dry Ingredients
- Gradually add the dry mixture to the wet mixture in three parts, folding gently with a spatula or mixing on low speed.
- Mix until just combined—avoid overmixing to keep the cake tender.
- Pro tip: Scrape the sides and bottom of the bowl to ensure all flour is incorporated without overworking the batter.
Step 5: Bake the Cake
- Divide the batter evenly between the two prepared pans.
- Smooth the tops with a spatula.
- Bake for 25–30 minutes, or until a toothpick inserted into the center comes out clean.
- Pro tip: Start checking at 25 minutes to avoid overbaking, which can dry out the cake.
Step 6: Cool the Layers
- Let the cakes cool in the pans for 10 minutes.
- Carefully run a knife around the edges, then invert onto a cooling rack.
- Peel off the parchment paper and let the layers cool completely before frosting.
Step 7: Make the Frosting
- Beat 8 oz cream cheese and ½ cup butter together until smooth.
- Gradually add 4 cups powdered sugar and 1 teaspoon vanilla extract, mixing until creamy and fluffy.
- Pro tip: Beat for at least 3–4 minutes for a light, airy frosting that spreads easily.
Step 8: Assemble the Cake
- Place the first cake layer on your serving plate.
- Spread a generous layer of frosting on top.
- Place the second cake layer on top and cover the entire cake with the remaining frosting.
- Smooth the edges with a spatula or create decorative swirls as desired.
Tips and Tricks for Success
- Measure ingredients carefully: Baking is all about precision. Using a kitchen scale can make your layers perfectly even.
- Room temperature ingredients: Let eggs, butter, and buttermilk sit out for about 30 minutes before mixing. It helps the batter come together smoothly.
- Don’t overmix: Fold gently after adding dry ingredients. Overmixing can make your moist green cake dense.
- Even layers: Use a toothpick or knife to level the cake tops before frosting—they stack better and look cleaner.
- Cool completely before frosting: Warm cakes can melt the frosting and make decorating messy. Patience here is key!
- Customize the color: Adjust green food coloring gradually to get the shade you love—bright, pastel, or deep green works beautifully.
Ingredient Substitutions and Variations
- Buttermilk: Can swap with 1 cup milk + 1 tablespoon lemon juice or vinegar if you don’t have buttermilk on hand.
- Vegetable oil: Melted coconut oil or light olive oil works well for a slightly different flavor.
- Cream cheese frosting: You can swap half of the cream cheese with mascarpone for a richer, creamier texture.
- Green coloring: Natural alternatives like spinach puree or matcha powder can be used for a subtle, healthier green cake.
- Flavor twists: Add a teaspoon of almond extract to the batter for a nutty hint or a tablespoon of cocoa for a darker green velvet variation.
Serving Suggestions
- I love serving this green velvet cake with a cup of hot coffee or tea—it’s the perfect balance of sweet and comforting.
- Pair slices with fresh berries like raspberries or strawberries for a pop of color and a tart contrast to the creamy frosting.
- For a St Patrick’s day dessert table, cut into small squares and serve alongside chocolate truffles or mini cupcakes—it’s festive and fun!
- Add a drizzle of caramel or chocolate sauce over each slice for an extra indulgent treat when hosting guests.
- Serve chilled after frosting—it keeps the layers intact and makes every bite creamy and refreshing.
Storage and Reheating Instructions
- Room temperature: Keep the cake covered with a cake dome or airtight container for up to 2 days.
- Refrigerator: Store in an airtight container for up to 5 days; allow the cake to come to room temperature before serving for the best texture.
- Freezer: Wrap individual slices in plastic wrap and place in a freezer-safe bag for up to 3 months. Thaw overnight in the fridge before serving.
- Reheating: Warm slices slightly in the microwave (10–15 seconds) for a soft, freshly-baked feel. Avoid overheating to prevent drying.
Frequently Asked Questions
How can I make this cake without food coloring?
You can use natural alternatives like spinach puree or matcha powder. The color will be more subtle, but it still gives that green dessert vibe without artificial coloring.
Can I make this cake ahead of time?
Absolutely! You can bake the layers a day in advance and keep them wrapped tightly at room temperature or in the fridge. Frost the next day for a fresh, homemade green cake.
What’s the best way to keep it moist?
Using buttermilk and not overmixing the batter are key. Also, don’t overbake—check at 25 minutes and remove once a toothpick comes out clean.
Can I freeze this cake?
Yes! Wrap slices in plastic wrap and store in a freezer-safe bag for up to 3 months. Thaw in the fridge overnight before serving.
Can I make this gluten-free?
You can try a 1-to-1 gluten-free flour blend, but the texture may be slightly different. Adding a teaspoon of xanthan gum can help maintain structure.
How do I make the frosting extra smooth?
Beat cream cheese and butter for 3–4 minutes before adding powdered sugar. This gives a creamy, spreadable frosting that’s perfect for decorating.
Did you try this green velvet cake? Let me know in the comments how it turned out! I love hearing your tips, tweaks, and creative twists—every baker has their own magic touch.
Green Velvet Cake
Equipment
- Mixing Bowls
- Electric mixer
- Measuring cups and spoons
- 8-inch round cake pans
- Spatula
- Cooling racks
- Oven thermometer
Ingredients
For the Cake
- 2 ½ cups all-purpose flour
- 2 cups granulated sugar
- 1 teaspoon baking powder
- 1 teaspoon baking soda
- ½ teaspoon salt
- 1 teaspoon cocoa powder
- 1 cup buttermilk room temperature
- 1 cup vegetable oil
- 4 large eggs room temperature
- 2 tablespoons green food coloring
- 1 teaspoon vanilla extract
- 1 teaspoon white vinegar
For the Frosting
- 8 oz cream cheese softened
- ½ cup unsalted butter softened
- 4 cups powdered sugar
- 1 teaspoon vanilla extract
Instructions
Step 1: Prep Your Oven and Pans
- Preheat your oven to 350°F (175°C).
- Grease two 8-inch round cake pans with butter or nonstick spray, then lightly dust with flour.
- Pro tip: Line the bottom with parchment paper for extra-easy cake release.
- Step 2: Mix the Dry Ingredients
- In a large mixing bowl, sift together 2 ½ cups flour, 2 cups sugar, 1 teaspoon baking powder, 1 teaspoon baking soda, ½ teaspoon salt, and 1 teaspoon cocoa powder.
- Whisk lightly to combine evenly.
- Pro tip: Sifting helps prevent lumps and makes your cake texture ultra-smooth.
Step 3: Combine the Wet Ingredients
- In another bowl, whisk 1 cup buttermilk, 1 cup vegetable oil, 4 eggs, 2 tablespoons green food coloring, 1 teaspoon vanilla extract, and 1 teaspoon white vinegar until smooth.
- Make sure the eggs are fully blended, and the color is even.
Step 4: Combine Wet and Dry Ingredients
- Gradually add the dry mixture to the wet mixture in three parts, folding gently with a spatula or mixing on low speed.
- Mix until just combined—avoid overmixing to keep the cake tender.
- Pro tip: Scrape the sides and bottom of the bowl to ensure all flour is incorporated without overworking the batter.
Step 5: Bake the Cake
- Divide the batter evenly between the two prepared pans.
- Smooth the tops with a spatula.
- Bake for 25–30 minutes, or until a toothpick inserted into the center comes out clean.
- Pro tip: Start checking at 25 minutes to avoid overbaking, which can dry out the cake.
Step 6: Cool the Layers
- Let the cakes cool in the pans for 10 minutes.
- Carefully run a knife around the edges, then invert onto a cooling rack.
- Peel off the parchment paper and let the layers cool completely before frosting.
Step 7: Make the Frosting
- Beat 8 oz cream cheese and ½ cup butter together until smooth.
- Gradually add 4 cups powdered sugar and 1 teaspoon vanilla extract, mixing until creamy and fluffy.
- Pro tip: Beat for at least 3–4 minutes for a light, airy frosting that spreads easily.
Step 8: Assemble the Cake
- Place the first cake layer on your serving plate.
- Spread a generous layer of frosting on top.
- Place the second cake layer on top and cover the entire cake with the remaining frosting.
- Smooth the edges with a spatula or create decorative swirls as desired.
Notes
Nutritional Value (Per Serving – Approximate)
- Calories: 420–450 kcal
- Carbohydrates: 52g
- Protein: 5g
- Fat: 22g
- Saturated Fat: 8g
- Sugar: 38g
- Fiber: 1g
- Cholesterol: 75mg
- Sodium: 320mg