Crispy Spring Rolls
Spring rolls are one of those dishes that instantly feel fresh, colorful, and satisfying without being heavy. They’re the kind of food that works just as well for a casual lunch as they do for a special gathering, and they fit perfectly into lighter spring meals when you want something flavorful but not overwhelming. With their crisp wrappers and vibrant filling, spring rolls bring a lovely balance of texture and taste to the table.
Making homemade spring rolls might sound intimidating at first, but it’s actually a lot simpler than most people expect. Once you prep your filling and get the hang of rolling, the process becomes almost relaxing. This easy spring roll recipe is designed to be approachable, even if you’re trying it for the first time, and the result is far more rewarding than anything store-bought.
What makes spring rolls especially appealing is how customizable they are. You can load them up with fresh vegetables, lean proteins, or even keep them completely plant-based. That flexibility makes them a great option if you’re aiming for healthy spring rolls without sacrificing flavor or crunch.
Whether you serve them as an appetizer, a light main dish, or part of a larger spread, spring rolls always feel right this time of year. They’re crisp, fresh, and satisfying in a way that perfectly matches the energy of the season—and once you master them at home, you’ll find yourself coming back to this recipe again and again.
Why You’ll Love It
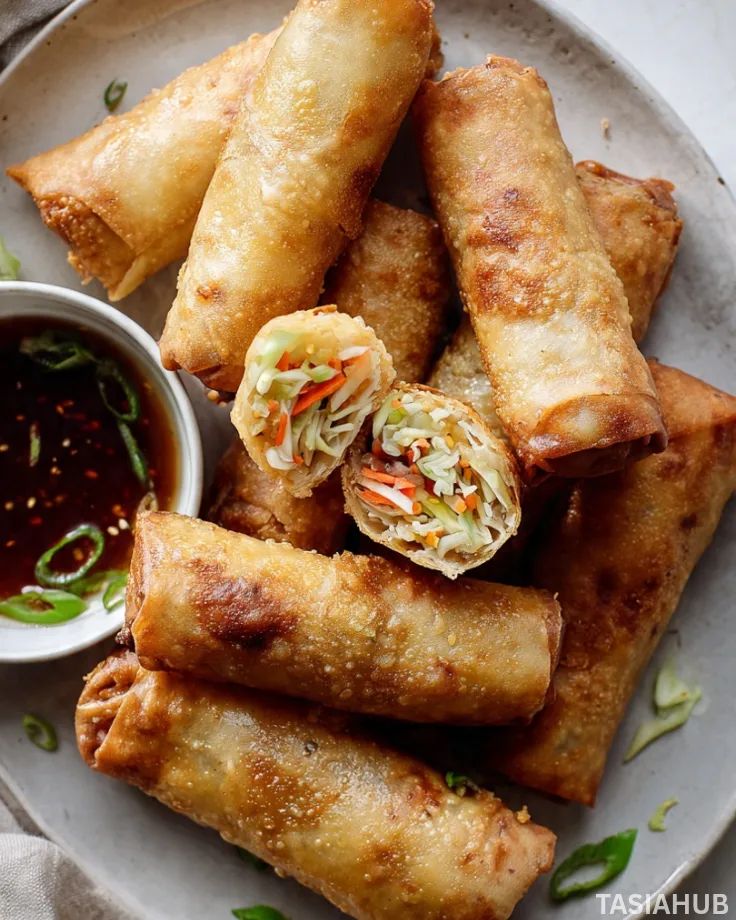
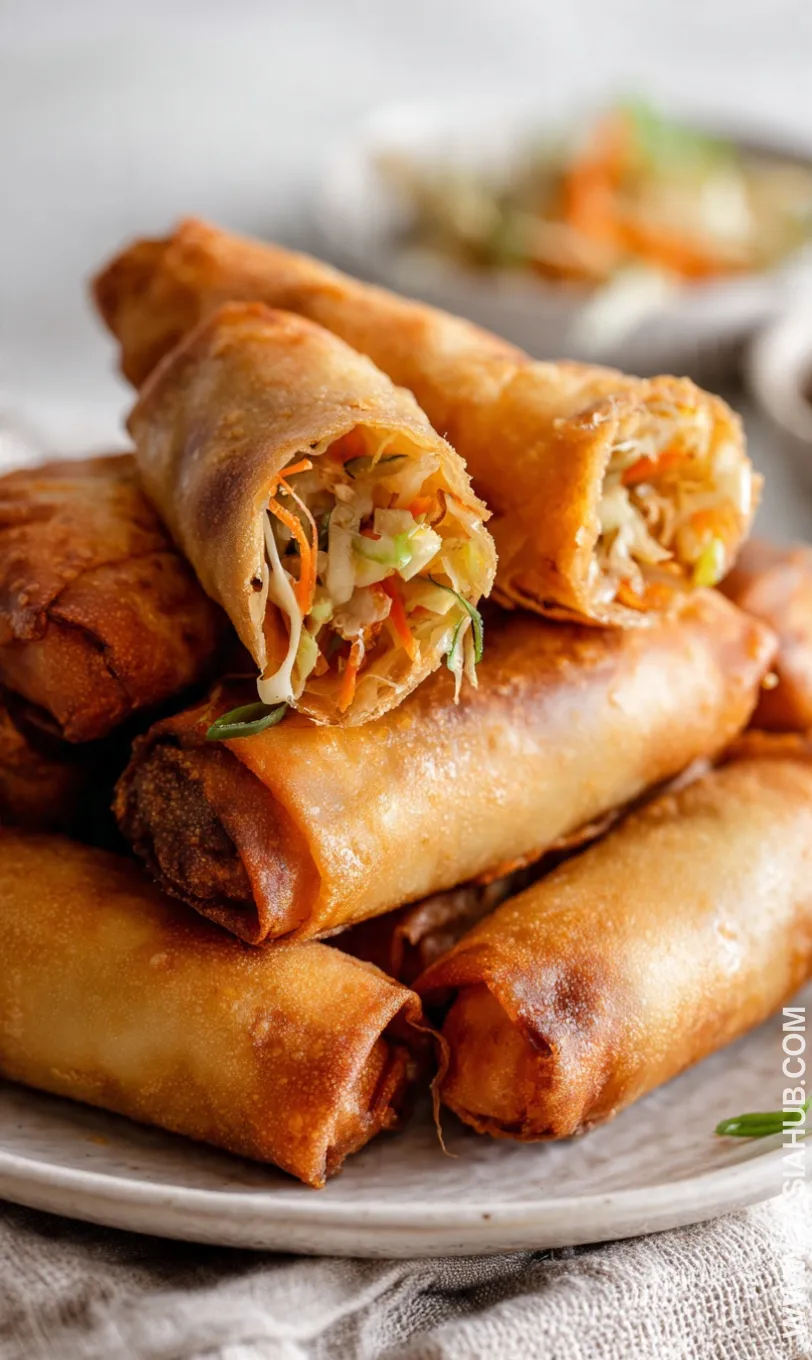
- Crispy on the outside, fresh on the inside – Every bite gives you that satisfying crunch followed by a light, flavorful filling that never feels greasy or heavy.
- Surprisingly simple to make – Once you try it, you’ll realize this is an easy spring roll recipe you can confidently pull off, even on busy days.
- Perfect for flexible eating – You can easily adjust the filling to suit your preferences, making it ideal for anyone who enjoys healthier, vegetable-forward spring meals.
- Great for sharing or meal prep – These rolls work beautifully as a party appetizer, a family favorite, or something you can prep ahead and enjoy throughout the week.
- Better than takeout – Homemade spring rolls let you control the ingredients, the freshness, and the flavor, giving you a result that tastes lighter, cleaner, and more satisfying than restaurant versions.
Ingredient List
For the Spring Rolls
- 12 spring roll wrappers
- 2 cups shredded cabbage
- 1 cup grated carrots
- 1 cup bean sprouts
- ½ cup thinly sliced spring onions
- 1 cup cooked chicken, shrimp, or tofu (optional)
- 2 cloves garlic, minced
- 1 teaspoon grated ginger
- 2 tablespoons soy sauce
- 1 tablespoon sesame oil
- Salt and black pepper, to taste
For Frying
- Vegetable oil, enough for deep or shallow frying
Ingredient Notes
- Spring roll wrappers – I always use the thinner wheat-based wrappers for extra crispiness. Keep them covered with a damp cloth so they don’t dry out while rolling.
- Cabbage – Green cabbage works perfectly here. Slice it thinly so it cooks fast and blends well with the other veggies.
- Garlic and ginger – Don’t skip these! They add that warm, savory depth that makes the filling taste restaurant-worthy.
- Soy sauce – Go for a good-quality soy sauce; it really boosts the flavor without needing much seasoning.
- Sesame oil – Just a little goes a long way. It adds a subtle nutty aroma that makes the filling taste richer.
- Protein choice – Chicken, shrimp, or tofu all work beautifully. Make sure it’s cooked and finely chopped so the rolls seal easily and cook evenly.
- Oil for frying – Use a neutral oil like vegetable or sunflower oil. It keeps the rolls crispy without overpowering the flavor.
Kitchen Equipment Needed
- Large mixing bowl – For combining the filling ingredients evenly without making a mess.
- Sharp knife – Makes slicing vegetables thin and uniform. I always reach for my chef’s knife here—it saves so much time.
- Cutting board – A stable surface for prepping all your veggies and protein.
- Skillet or frying pan – Used to cook the filling quickly and evenly before rolling.
- Wooden spoon or spatula – Perfect for stirring the filling without breaking up the veggies too much.
- Clean kitchen towel – Keeps the spring roll wrappers from drying out while you work.
- Small bowl of water – Helps seal the wrappers so they stay closed during frying.
- Deep pan or pot – Needed for frying the rolls to golden perfection.
- Tongs or slotted spoon – For safely turning and removing the spring rolls from hot oil.
- Paper towels or cooling rack – Drains excess oil and keeps the rolls crisp after frying.
Instructions
1. Prepare the Filling
- Heat a skillet over medium heat and add the sesame oil.
- Add the minced garlic and grated ginger, stirring for about 30 seconds until fragrant.
- Add the shredded cabbage, carrots, bean sprouts, and spring onions.
- Cook for 3–4 minutes, stirring often, until the vegetables soften slightly but still have some crunch.
- Stir in the soy sauce, season lightly with salt and black pepper, then add your cooked protein if using.
- Remove from heat and let the filling cool completely.
Pro tip: Letting the filling cool prevents steam from softening the wrappers, which helps your spring rolls stay crispy.
2. Set Up Your Rolling Station
- Lay a clean kitchen towel on your counter and place a spring roll wrapper on top.
- Keep the remaining wrappers covered with another damp towel to stop them from drying out.
- Place a small bowl of water nearby for sealing the rolls.
- Spoon about 2 tablespoons of filling near the bottom center of the wrapper.
Pro tip: Don’t overfill. Too much filling makes the rolls harder to seal and more likely to burst while frying.
3. Roll the Spring Rolls
- Fold the bottom edge of the wrapper over the filling and tuck it in snugly.
- Fold in both sides toward the center, keeping the roll tight.
- Roll upward until almost sealed, then lightly brush the top edge with water.
- Finish rolling and gently press to seal.
Pro tip: Roll firmly but gently—tight rolls fry evenly and hold their shape better.
4. Heat the Oil
- Pour oil into a deep pan or pot, filling it about halfway.
- Heat over medium heat until the oil reaches frying temperature (about 350°F / 175°C).
- Test the oil by dropping in a small piece of wrapper—it should sizzle immediately.
Pro tip: Oil that’s too cool will make the rolls greasy, while oil that’s too hot can burn the wrappers before the filling heats through.
5. Fry Until Golden and Crispy
- Carefully place the spring rolls into the hot oil, working in small batches.
- Fry for 3–4 minutes, turning occasionally, until evenly golden brown.
- Use tongs or a slotted spoon to remove the rolls from the oil.
- Transfer to paper towels or a cooling rack to drain.
Pro tip: Fry in batches to keep the oil temperature steady and ensure crisp, evenly cooked rolls.
6. Serve and Enjoy
- Let the spring rolls cool slightly before serving.
- Pair with your favorite dipping sauce and enjoy them while they’re hot and crunchy.
- Serve as an appetizer, light meal, or part of a fresh spring spread.
Tips and Tricks for Success
- Prep everything before you start rolling – Once the wrappers are out, things move quickly. Having everything ready makes the process smooth and stress-free.
- Keep wrappers covered at all times – Spring roll wrappers dry out fast. A damp kitchen towel is your best friend here.
- Cool the filling completely – Warm filling releases steam, which can make the rolls soggy and harder to seal.
- Roll on a flat, clean surface – This gives you better control and helps keep the rolls tight and even.
- Watch your oil temperature – Steady medium heat gives you crisp rolls without burning. If the oil starts smoking, it’s too hot.
- Drain properly after frying – A cooling rack keeps them crisp longer than stacking them on paper towels.
Ingredient Substitutions and Variations
- Make it vegetarian – Skip the meat and add mushrooms, bell peppers, or extra carrots for more texture and flavor.
- Go fully plant-based – Use tofu or tempeh and swap soy sauce for a vegan-friendly option if needed.
- Baked version – Brush the rolls lightly with oil and bake at 400°F (200°C) for about 20–25 minutes, flipping halfway through.
- Air fryer option – Spray lightly with oil and air fry at 375°F (190°C) for 10–12 minutes, turning once for even crispiness.
- Spice it up – Add chili flakes, fresh chopped chili, or a dash of sriracha to the filling for extra heat.
- Swap the veggies – Zucchini, napa cabbage, or thinly sliced green beans all work beautifully in spring rolls.
Serving Suggestions
- With a dipping sauce trio – Sweet chili sauce, soy sauce, and a creamy peanut dip make every bite exciting. I usually put out all three and let everyone mix and match.
- As a light lunch plate – I love serving these spring rolls with a crisp green salad and a citrusy vinaigrette—it keeps the meal fresh and balanced.
- Party-style appetizer – Arrange them on a platter with fresh herbs and lemon wedges for an easy crowd-pleaser.
- Alongside a soup – Pair with a light vegetable or miso soup for a cozy but still fresh spring meal.
- Family-style dinner – Serve with stir-fried noodles or fried rice for a more filling, shareable meal.

Storage and Reheating Instructions
- Storing leftovers – Let spring rolls cool completely, then store in an airtight container in the refrigerator for up to 3 days.
- Avoid stacking directly – Place parchment paper between layers to keep them from sticking together.
- Reheating in the oven – Reheat at 375°F (190°C) for 10–12 minutes until hot and crispy again.
- Reheating in the air fryer – Heat at 350°F (175°C) for 5–7 minutes for the best texture.
- Avoid the microwave – It softens the wrappers and takes away that signature crunch.
Frequently Asked Questions
Can I make spring rolls ahead of time?
Yes! You can prep and roll them a few hours in advance. Just keep them covered with a damp cloth until you’re ready to fry.
Can I freeze spring rolls?
Absolutely! Freeze them uncooked on a baking sheet, then transfer to a freezer bag. Fry straight from frozen—no need to thaw.
Can I bake spring rolls instead of frying?
Yes, brushing them lightly with oil and baking at 400°F (200°C) for 20–25 minutes gives a lighter, crispy version.
What can I use as a dipping sauce?
Classic options include sweet chili sauce, soy sauce, or peanut sauce. I love mixing a little lime juice into soy sauce for a fresh twist.
How do I keep spring rolls from getting soggy?
Make sure the filling is completely cool and don’t overfill the wrappers. Fry in medium-hot oil and drain on a rack instead of stacking.
Can I make them vegetarian or vegan?
Definitely! Swap meat for tofu, tempeh, or extra veggies. Use vegan soy sauce if needed, and you’ll still get full flavor.
Did you try this recipe? Let me know in the comments how it turned out—I love hearing your spring roll creations!

Crispy Spring Rolls
Equipment
- Large mixing bowl
- Sharp Knife
- Cutting board
- Skillet or frying pan
- Wooden spoon or spatula
- Clean kitchen towel
- Small bowl of water
- Deep pan or pot
- Tongs or slotted spoon
- Paper towels or cooling rack
Ingredients
For the Spring Rolls
- 12 spring roll wrappers
- 2 cups shredded cabbage
- 1 cup grated carrots
- 1 cup bean sprouts
- ½ cup thinly sliced spring onions
- 1 cup cooked chicken shrimp, or tofu (optional)
- 2 cloves garlic minced
- 1 teaspoon grated ginger
- 2 tablespoons soy sauce
- 1 tablespoon sesame oil
- Salt and black pepper to taste
For Frying
- Vegetable oil enough for deep or shallow frying
Instructions
Prepare the Filling
- Heat a skillet over medium heat and add the sesame oil.
- Add the minced garlic and grated ginger, stirring for about 30 seconds until fragrant.
- Add the shredded cabbage, carrots, bean sprouts, and spring onions.
- Cook for 3–4 minutes, stirring often, until the vegetables soften slightly but still have some crunch.
- Stir in the soy sauce, season lightly with salt and black pepper, then add your cooked protein if using.
- Remove from heat and let the filling cool completely.
- Pro tip: Letting the filling cool prevents steam from softening the wrappers, which helps your spring rolls stay crispy.
Set Up Your Rolling Station
- Lay a clean kitchen towel on your counter and place a spring roll wrapper on top.
- Keep the remaining wrappers covered with another damp towel to stop them from drying out.
- Place a small bowl of water nearby for sealing the rolls.
- Spoon about 2 tablespoons of filling near the bottom center of the wrapper.
- Pro tip: Don’t overfill. Too much filling makes the rolls harder to seal and more likely to burst while frying.
Roll the Spring Rolls
- Fold the bottom edge of the wrapper over the filling and tuck it in snugly.
- Fold in both sides toward the center, keeping the roll tight.
- Roll upward until almost sealed, then lightly brush the top edge with water.
- Finish rolling and gently press to seal.
- Pro tip: Roll firmly but gently—tight rolls fry evenly and hold their shape better.
Heat the Oil
- Pour oil into a deep pan or pot, filling it about halfway.
- Heat over medium heat until the oil reaches frying temperature (about 350°F / 175°C).
- Test the oil by dropping in a small piece of wrapper—it should sizzle immediately.
- Pro tip: Oil that’s too cool will make the rolls greasy, while oil that’s too hot can burn the wrappers before the filling heats through.
Fry Until Golden and Crispy
- Carefully place the spring rolls into the hot oil, working in small batches.
- Fry for 3–4 minutes, turning occasionally, until evenly golden brown.
- Use tongs or a slotted spoon to remove the rolls from the oil.
- Transfer to paper towels or a cooling rack to drain.
- Pro tip: Fry in batches to keep the oil temperature steady and ensure crisp, evenly cooked rolls.
Serve and Enjoy
- Let the spring rolls cool slightly before serving.
- Pair with your favorite dipping sauce and enjoy them while they’re hot and crunchy.
- Serve as an appetizer, light meal, or part of a fresh spring spread.
Notes
Nutritional Value (Per Serving – Approximate)
- Calories: 280–320 kcal
- Protein: 8–10 g
- Carbohydrates: 30–35 g
- Fat: 14–18 g
- Fiber: 4–6 g
- Sugar: 3–5 g
- Sodium: Moderate