Chocolate Tart Recipe
A chocolate tart is the kind of dessert that instantly feels special, whether you’re serving it at a dinner party or enjoying a quiet slice at home. With its crisp crust and rich, silky filling, this dessert strikes the perfect balance between elegance and comfort. It looks impressive on the table, yet it’s surprisingly simple to pull together—no fancy techniques or hard-to-find ingredients required.
This recipe is one I always come back to when I want a dessert that delivers bold chocolate flavor without being overly sweet. The smooth ganache filling melts in your mouth, while the buttery crust adds just enough texture to keep every bite interesting. It’s indulgent without being heavy, making it a crowd-pleaser for both chocolate lovers and casual dessert fans alike.
If you’re planning a Valentine’s Day dessert, this chocolate tart checks all the boxes. It’s romantic, timeless, and perfect for sharing, whether you’re hosting a cozy dinner or putting together a homemade treat for someone special. Add a few fresh berries or a light dusting of cocoa powder, and it instantly feels restaurant-worthy.
What I love most is how approachable this recipe is. Once you understand how to make chocolate tarts at home, you’ll realize it’s one of the best chocolate desserts to keep in your rotation. This easy chocolate tart proves that you don’t need complicated steps to create something truly memorable—just good ingredients, a little patience, and a love for chocolate.
Why You’ll Love It
- Rich chocolate flavor without being overpowering – The filling is smooth, deep, and chocolate-forward, but not overly sweet, making each slice satisfying without feeling heavy.
- Elegant enough for special occasions – This tart looks stunning on the table, which makes it perfect for celebrations, date nights, or when you want a dessert that feels extra special with minimal effort.
- Simple steps, impressive results – The process is straightforward and beginner-friendly, yet the final dessert looks like something you’d order at a bakery or restaurant.
- Perfect make-ahead dessert – You can prepare it in advance and let it chill until serving time, which makes entertaining far less stressful.
- Easy to customize – Serve it plain, add fresh berries, a drizzle of caramel, or a dollop of whipped cream to make it your own every single time.
Ingredient List
For the Tart Crust
- 1 ½ cups all-purpose flour
- ¼ cup unsweetened cocoa powder
- ½ cup cold unsalted butter, cubed
- ¼ cup granulated sugar
- ¼ teaspoon salt
- 1 large egg yolk
- 2–3 tablespoons cold water
For the Chocolate Filling
- 8 oz (225 g) dark chocolate, chopped
- ¾ cup heavy cream
- 2 tablespoons unsalted butter
- 2 tablespoons granulated sugar
- 1 teaspoon vanilla extract
- Pinch of salt
Ingredient Notes
- Dark chocolate – Go for good-quality dark chocolate (60–70% cocoa). I always use baking chocolate or a bar I’d happily snack on—it makes the filling extra smooth and deeply chocolatey.
- Heavy cream – This is what gives the tart its silky, melt-in-your-mouth texture. Don’t swap it for milk; it really makes a big difference here.
- Unsalted butter – Using unsalted butter lets you control the salt level. Plus, it adds richness to both the crust and the filling.
- Cocoa powder – Use unsweetened cocoa powder for the crust. It enhances the chocolate flavor without adding extra sweetness.
- Egg yolk – This helps bind the crust and gives it a tender, slightly crumbly texture. Don’t skip it—it keeps the crust from falling apart.
- Vanilla extract – A small amount goes a long way in rounding out the chocolate flavor. I always use pure vanilla for the best taste.
Kitchen Equipment Needed
- Tart pan (9-inch, preferably with removable bottom) – Makes it easy to release the tart cleanly. I always use one with a removable base—it saves so much stress when serving.
- Mixing bowls – For preparing the crust and the chocolate filling. A medium and a large bowl usually do the job.
- Pastry cutter or food processor – Helps cut the butter into the flour quickly for a flaky crust. I reach for my food processor when I want to save time.
- Rolling pin – For rolling out the tart dough evenly. I like a simple wooden one for better control.
- Saucepan – Used to heat the cream gently for the ganache. Keep it small so the cream doesn’t overheat.
- Whisk or silicone spatula – For mixing the chocolate filling until smooth. A silicone spatula is my favorite—it gets every last bit of chocolate.
- Measuring cups and spoons – Accurate measurements make all the difference, especially with baking.
- Sharp knife – For chopping the chocolate into small, even pieces so it melts smoothly.
Instructions
1. Prepare the Tart Crust
- In a large mixing bowl, combine the flour, cocoa powder, sugar, and salt. Give it a quick stir so everything is evenly mixed.
- Add the cold, cubed butter and use a pastry cutter or your fingertips to work it into the dry ingredients until the mixture looks like fine crumbs.
- Stir in the egg yolk, then add the cold water one tablespoon at a time until the dough just comes together.
- Shape the dough into a disc, wrap it tightly, and refrigerate for 30 minutes. This helps the butter firm up and keeps the crust from shrinking.
Pro tip: If the dough feels sticky, sprinkle in a little extra flour. If it feels dry, add a few drops of cold water—small adjustments make a big difference.
2. Roll and Bake the Crust
- Preheat your oven to 350°F (175°C).
- Lightly flour your work surface and roll the chilled dough into a circle slightly larger than your tart pan.
- Carefully transfer the dough to the pan, pressing it gently into the bottom and sides. Trim any excess dough from the edges.
- Prick the bottom of the crust with a fork to prevent air bubbles.
- Bake for 15–18 minutes, or until the crust looks set and slightly firm to the touch.
- Remove from the oven and let it cool completely in the pan.
Pro tip: For an extra crisp crust, let it bake until the edges look dry and matte, not glossy.
3. Make the Chocolate Filling
- Place the chopped chocolate in a heatproof bowl and set it aside.
- In a small saucepan, heat the heavy cream and sugar over medium heat until it’s hot but not boiling. You should see steam, not bubbles.
- Pour the hot cream over the chocolate and let it sit for 2–3 minutes.
- Add the butter, vanilla extract, and salt, then gently whisk until the mixture is smooth and glossy.
Pro tip: Whisk slowly and steadily to avoid trapping air bubbles in the ganache.
4. Assemble the Tart
- Pour the chocolate filling into the cooled tart crust, spreading it evenly with a spatula if needed.
- Gently tap the pan on the counter to release any air bubbles.
- Refrigerate the tart for at least 2 hours, or until the filling is fully set.
Pro tip: If you want perfectly clean slices, chill the tart overnight and slice with a warm knife.
5. Serve and Enjoy
- Remove the tart from the pan just before serving.
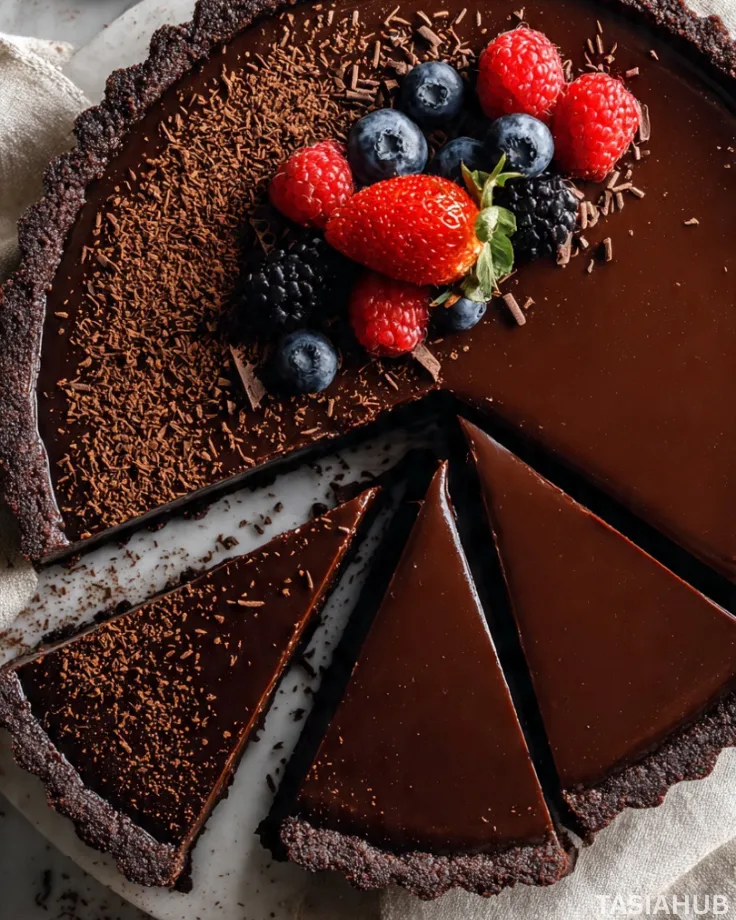
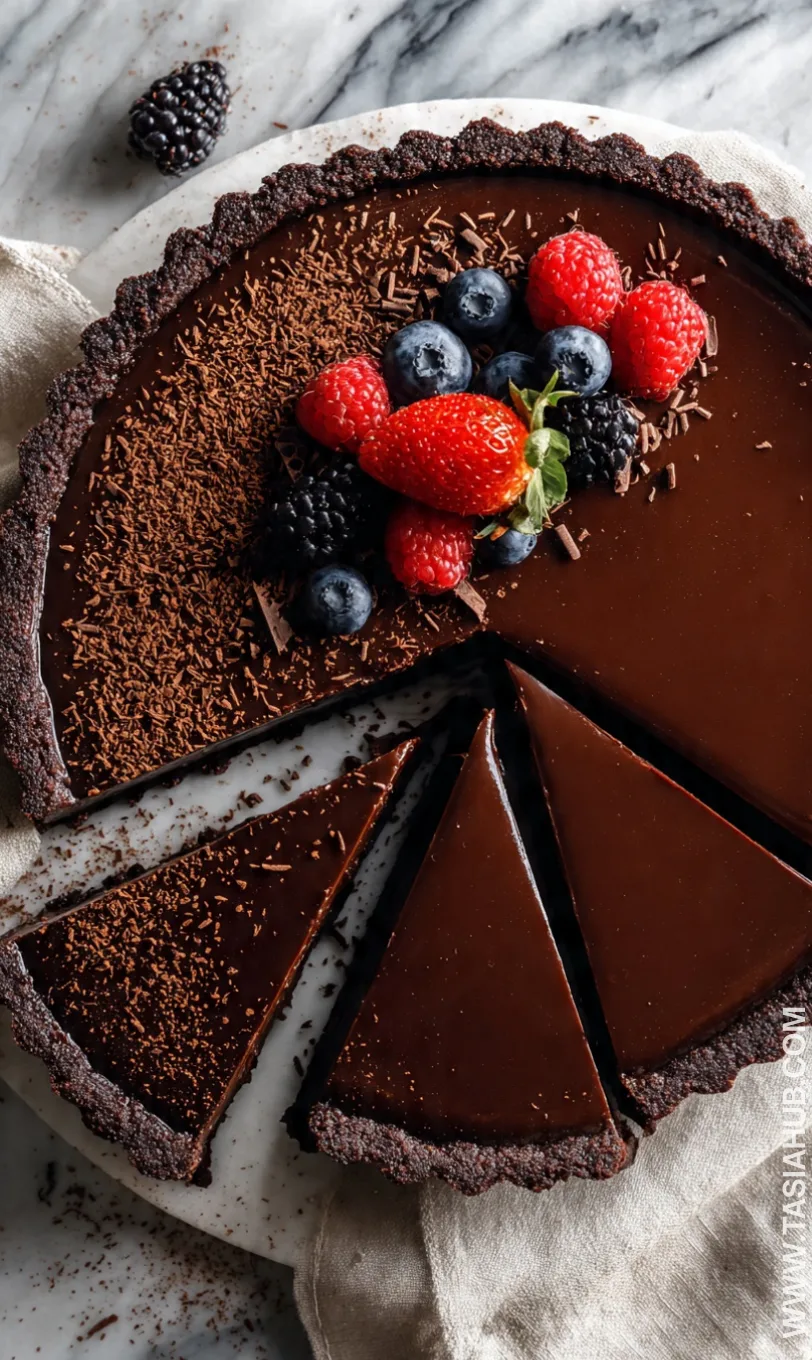
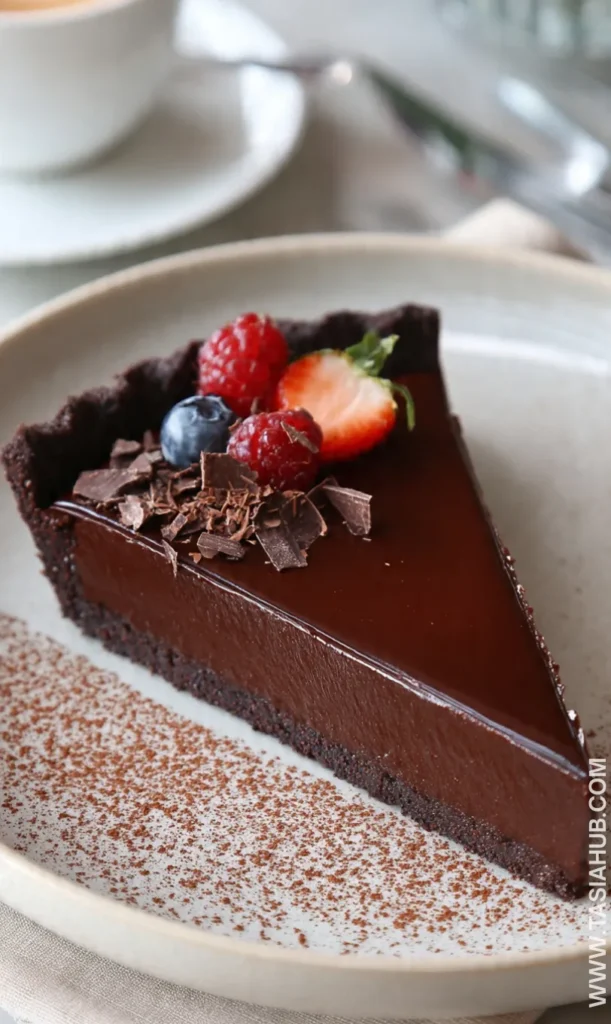
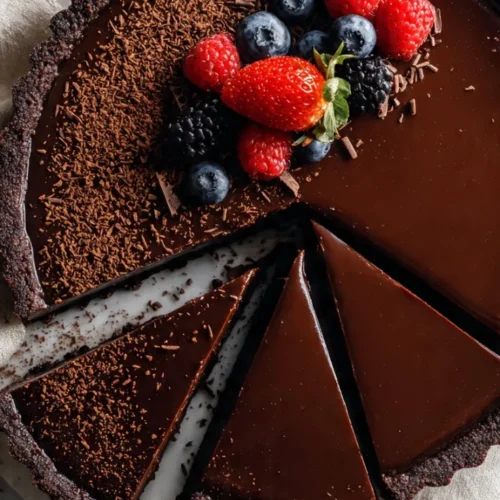
- Slice and serve as is, or top with fresh berries, whipped cream, or a light dusting of cocoa powder for an extra touch.
This chocolate tart is best enjoyed slightly chilled, when the filling is firm but still luxuriously smooth.
Tips and Tricks for Success
- Use cold butter for the crust – This helps create a tender, crisp base instead of a dense one. If your kitchen is warm, pop the butter back in the fridge for a few minutes before using it.
- Let the crust cool completely – Pouring warm filling into a hot crust can make it soggy, so patience here really pays off.
- Chop the chocolate finely – Smaller pieces melt more evenly, giving you a smoother, glossier filling.
- Avoid boiling the cream – Hot is perfect; boiling can cause the chocolate to seize or turn grainy.
- Tap the pan before chilling – A gentle tap on the counter helps release trapped air bubbles for a flawless finish.
Ingredient Substitutions and Variations
- Milk chocolate instead of dark chocolate – Use milk chocolate for a sweeter, milder flavor. Reduce the sugar slightly to keep it balanced.
- Gluten-free crust option – Swap the all-purpose flour for a gluten-free baking blend with a 1:1 ratio.
- Dairy-free version – Use full-fat coconut cream in place of heavy cream and a dairy-free butter alternative. It adds a subtle coconut note that pairs beautifully with chocolate.
- Flavor boost additions – Stir in a pinch of espresso powder, orange zest, or a splash of coffee liqueur for extra depth.
- Topping variations – Finish with raspberries, strawberries, chopped nuts, or a drizzle of caramel or chocolate sauce to change up the look and flavor.
Serving Suggestions
- With fresh berries – I love serving this chocolate tart with raspberries or strawberries on the side. The slight tartness cuts through the richness beautifully.
- Topped with whipped cream – A light swirl of freshly whipped cream adds softness and makes each bite feel extra indulgent without being too heavy.
- Drizzled with chocolate or caramel sauce – When I’m feeling fancy, I add a warm drizzle right before serving—it makes the tart look bakery-style and even more tempting.
- Paired with coffee or espresso – This is my favorite way to enjoy it after dinner. The bitterness of coffee balances the chocolate so well.
- With a scoop of vanilla ice cream – Slightly chilled tart plus cold ice cream is such a good contrast, especially when serving guests.
Storage and Reheating Instructions
- Refrigerator storage – Store the tart in an airtight container in the fridge for up to 4 days. The flavor actually gets better after the first day.
- Freezer storage – You can freeze the tart (whole or sliced) for up to 1 month. Wrap it tightly in plastic wrap and foil to prevent freezer burn.
- Thawing instructions – Thaw frozen tart overnight in the refrigerator for best texture.
- Reheating – This tart is best served chilled or at room temperature, so reheating isn’t necessary. If you prefer it slightly softer, let it sit out for 10–15 minutes before serving.
- Slicing tip – For clean slices, wipe your knife with a warm, damp cloth between cuts.
Frequently Asked Questions
Can I make this chocolate tart ahead of time?
Yes! This tart is perfect for making ahead. You can prepare it a day in advance and keep it refrigerated until you’re ready to serve. It sets beautifully and tastes even better after chilling.
What’s the best chocolate to use for the filling?
High-quality dark chocolate works best, ideally between 60–70% cocoa. Using chocolate you enjoy eating on its own will give you the richest, smoothest flavor.
Why is my filling not setting properly?
This usually happens if the cream was too hot or the measurements were off. Make sure the cream is hot but not boiling, and give the tart enough time to chill fully in the refrigerator.
Can I use a store-bought crust?
Absolutely. A store-bought chocolate or regular tart crust works if you’re short on time. The homemade crust adds extra flavor, but both options are delicious.
How do I get clean, neat slices?
Chill the tart well and use a sharp knife warmed under hot water. Wipe the blade clean between each slice for that bakery-style finish.
Can I add toppings directly to the filling?
Yes, but keep them light. Fresh berries, a sprinkle of flaky salt, or shaved chocolate work best without weighing the filling down.
Did you try this recipe? Let me know in the comments how it turned out—I’d love to hear how you served it!
Chocolate Tart Recipe
Equipment
- Tart pan (9-inch, preferably with removable bottom)
- Mixing Bowls
- Pastry cutter or food processor
- Rolling Pin
- Saucepan
- Whisk or silicone spatula
- Measuring cups and spoons
- Sharp Knife
Ingredients
For the Tart Crust
- 1 ½ cups all-purpose flour
- ¼ cup unsweetened cocoa powder
- ½ cup cold unsalted butter cubed
- ¼ cup granulated sugar
- ¼ teaspoon salt
- 1 large egg yolk
- 2 –3 tablespoons cold water
For the Chocolate Filling
- 8 oz 225 g dark chocolate, chopped
- ¾ cup heavy cream
- 2 tablespoons unsalted butter
- 2 tablespoons granulated sugar
- 1 teaspoon vanilla extract
- Pinch of salt
Instructions
Prepare the Tart Crust
- In a large mixing bowl, combine the flour, cocoa powder, sugar, and salt. Give it a quick stir so everything is evenly mixed.
- Add the cold, cubed butter and use a pastry cutter or your fingertips to work it into the dry ingredients until the mixture looks like fine crumbs.
- Stir in the egg yolk, then add the cold water one tablespoon at a time until the dough just comes together.
- Shape the dough into a disc, wrap it tightly, and refrigerate for 30 minutes. This helps the butter firm up and keeps the crust from shrinking.
- Pro tip: If the dough feels sticky, sprinkle in a little extra flour. If it feels dry, add a few drops of cold water—small adjustments make a big difference.
Roll and Bake the Crust
- Preheat your oven to 350°F (175°C).
- Lightly flour your work surface and roll the chilled dough into a circle slightly larger than your tart pan.
- Carefully transfer the dough to the pan, pressing it gently into the bottom and sides. Trim any excess dough from the edges.
- Prick the bottom of the crust with a fork to prevent air bubbles.
- Bake for 15–18 minutes, or until the crust looks set and slightly firm to the touch.
- Remove from the oven and let it cool completely in the pan.
- Pro tip: For an extra crisp crust, let it bake until the edges look dry and matte, not glossy.
Make the Chocolate Filling
- Place the chopped chocolate in a heatproof bowl and set it aside.
- In a small saucepan, heat the heavy cream and sugar over medium heat until it’s hot but not boiling. You should see steam, not bubbles.
- Pour the hot cream over the chocolate and let it sit for 2–3 minutes.
- Add the butter, vanilla extract, and salt, then gently whisk until the mixture is smooth and glossy.
- Pro tip: Whisk slowly and steadily to avoid trapping air bubbles in the ganache.
Assemble the Tart
- Pour the chocolate filling into the cooled tart crust, spreading it evenly with a spatula if needed.
- Gently tap the pan on the counter to release any air bubbles.
- Refrigerate the tart for at least 2 hours, or until the filling is fully set.
- Pro tip: If you want perfectly clean slices, chill the tart overnight and slice with a warm knife.
Serve and Enjoy
- Remove the tart from the pan just before serving.
- Slice and serve as is, or top with fresh berries, whipped cream, or a light dusting of cocoa powder for an extra touch.
Notes
Nutritional Value (per serving, approximate)
- Calories: 360–400 kcal
- Carbohydrates: 32 g
- Protein: 5 g
- Fat: 26 g
- Saturated Fat: 15 g
- Fiber: 3 g
- Sugar: 20 g
- Sodium: 120 mg